Package Exports
- @koush/face-api.js
This package does not declare an exports field, so the exports above have been automatically detected and optimized by JSPM instead. If any package subpath is missing, it is recommended to post an issue to the original package (@koush/face-api.js) to support the "exports" field. If that is not possible, create a JSPM override to customize the exports field for this package.
Readme
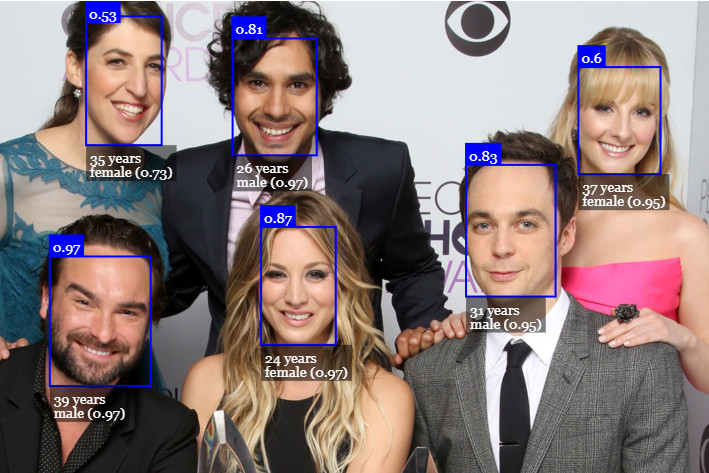
face-api.js

![]()
JavaScript face recognition API for the browser and nodejs implemented on top of tensorflow.js core (tensorflow/tfjs-core)
Click me for Live Demos!
Tutorials
- face-api.js — JavaScript API for Face Recognition in the Browser with tensorflow.js
- Realtime JavaScript Face Tracking and Face Recognition using face-api.js’ MTCNN Face Detector
- Realtime Webcam Face Detection And Emotion Recognition - Video
- Easy Face Recognition Tutorial With JavaScript - Video
- Using face-api.js with Vue.js and Electron
- Add Masks to People - Gant Laborde on Learn with Jason
Table of Contents
- Features
- Running the Examples
- face-api.js for the Browser
- face-api.js for Nodejs
- Usage
- Available Models
- API Documentation
Features
Face Recognition
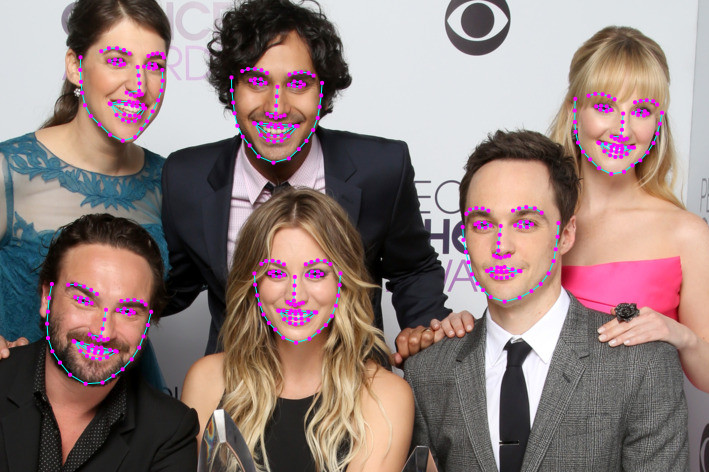
Face Landmark Detection
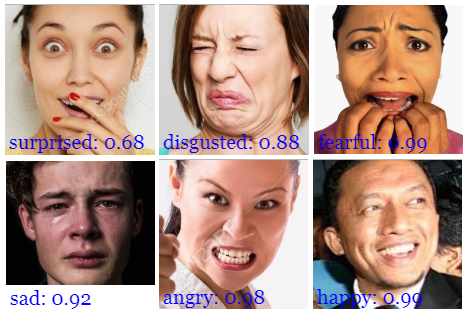
Face Expression Recognition
Age Estimation & Gender Recognition
Running the Examples
Clone the repository:
git clone https://github.com/justadudewhohacks/face-api.js.gitRunning the Browser Examples
cd face-api.js/examples/examples-browser
npm i
npm start
Browse to http://localhost:3000/.
Running the Nodejs Examples
cd face-api.js/examples/examples-nodejs
npm i
Now run one of the examples using ts-node:
ts-node faceDetection.tsOr simply compile and run them with node:
tsc faceDetection.ts
node faceDetection.js
face-api.js for the Browser
Simply include the latest script from dist/face-api.js.
Or install it via npm:
npm i face-api.jsface-api.js for Nodejs
We can use the equivalent API in a nodejs environment by polyfilling some browser specifics, such as HTMLImageElement, HTMLCanvasElement and ImageData. The easiest way to do so is by installing the node-canvas package.
Alternatively you can simply construct your own tensors from image data and pass tensors as inputs to the API.
Furthermore you want to install @tensorflow/tfjs-node (not required, but highly recommended), which speeds things up drastically by compiling and binding to the native Tensorflow C++ library:
npm i face-api.js canvas @tensorflow/tfjs-nodeNow we simply monkey patch the environment to use the polyfills:
// import nodejs bindings to native tensorflow,
// not required, but will speed up things drastically (python required)
import '@tensorflow/tfjs-node';

// implements nodejs wrappers for HTMLCanvasElement, HTMLImageElement, ImageData
import * as canvas from 'canvas';

import * as faceapi from 'face-api.js';

// patch nodejs environment, we need to provide an implementation of
// HTMLCanvasElement and HTMLImageElement
const { Canvas, Image, ImageData } = canvas
faceapi.env.monkeyPatch({ Canvas, Image, ImageData })
Getting Started
Loading the Models
All global neural network instances are exported via faceapi.nets:
console.log(faceapi.nets)
// ageGenderNet
// faceExpressionNet
// faceLandmark68Net
// faceLandmark68TinyNet
// faceRecognitionNet
// ssdMobilenetv1
// tinyFaceDetector
// tinyYolov2
To load a model, you have to provide the corresponding manifest.json file as well as the model weight files (shards) as assets. Simply copy them to your public or assets folder. The manifest.json and shard files of a model have to be located in the same directory / accessible under the same route.
Assuming the models reside in public/models:
await faceapi.nets.ssdMobilenetv1.loadFromUri('/models')
// accordingly for the other models:
// await faceapi.nets.faceLandmark68Net.loadFromUri('/models')
// await faceapi.nets.faceRecognitionNet.loadFromUri('/models')
// ...
In a nodejs environment you can furthermore load the models directly from disk:
await faceapi.nets.ssdMobilenetv1.loadFromDisk('./models')You can also load the model from a tf.NamedTensorMap:
await faceapi.nets.ssdMobilenetv1.loadFromWeightMap(weightMap)Alternatively, you can also create own instances of the neural nets:
const net = new faceapi.SsdMobilenetv1()
await net.loadFromUri('/models')
You can also load the weights as a Float32Array (in case you want to use the uncompressed models):
// using fetch
net.load(await faceapi.fetchNetWeights('/models/face_detection_model.weights'))

// using axios
const res = await axios.get('/models/face_detection_model.weights', { responseType: 'arraybuffer' })
const weights = new Float32Array(res.data)
net.load(weights)
High Level API
In the following input can be an HTML img, video or canvas element or the id of that element.
<img id="myImg" src="images/example.png" />
<video id="myVideo" src="media/example.mp4" />
<canvas id="myCanvas" />
const input = document.getElementById('myImg')
// const input = document.getElementById('myVideo')
// const input = document.getElementById('myCanvas')
// or simply:
// const input = 'myImg'Detecting Faces
Detect all faces in an image. Returns Array<FaceDetection>:
const detections = await faceapi.detectAllFaces(input)Detect the face with the highest confidence score in an image. Returns FaceDetection | undefined:
const detection = await faceapi.detectSingleFace(input)By default detectAllFaces and detectSingleFace utilize the SSD Mobilenet V1 Face Detector. You can specify the face detector by passing the corresponding options object:
const detections1 = await faceapi.detectAllFaces(input, new faceapi.SsdMobilenetv1Options())
const detections2 = await faceapi.detectAllFaces(input, new faceapi.TinyFaceDetectorOptions())
You can tune the options of each face detector as shown here.
Detecting 68 Face Landmark Points
After face detection, we can furthermore predict the facial landmarks for each detected face as follows:
Detect all faces in an image + computes 68 Point Face Landmarks for each detected face. Returns Array<WithFaceLandmarks<WithFaceDetection<{}>>>:
const detectionsWithLandmarks = await faceapi.detectAllFaces(input).withFaceLandmarks()Detect the face with the highest confidence score in an image + computes 68 Point Face Landmarks for that face. Returns WithFaceLandmarks<WithFaceDetection<{}>> | undefined:
const detectionWithLandmarks = await faceapi.detectSingleFace(input).withFaceLandmarks()You can also specify to use the tiny model instead of the default model:
const useTinyModel = true
const detectionsWithLandmarks = await faceapi.detectAllFaces(input).withFaceLandmarks(useTinyModel)
Computing Face Descriptors
After face detection and facial landmark prediction the face descriptors for each face can be computed as follows:
Detect all faces in an image + compute 68 Point Face Landmarks for each detected face. Returns Array<WithFaceDescriptor<WithFaceLandmarks<WithFaceDetection<{}>>>>:
const results = await faceapi.detectAllFaces(input).withFaceLandmarks().withFaceDescriptors()Detect the face with the highest confidence score in an image + compute 68 Point Face Landmarks and face descriptor for that face. Returns WithFaceDescriptor<WithFaceLandmarks<WithFaceDetection<{}>>> | undefined:
const result = await faceapi.detectSingleFace(input).withFaceLandmarks().withFaceDescriptor()Recognizing Face Expressions
Face expression recognition can be performed for detected faces as follows:
Detect all faces in an image + recognize face expressions of each face. Returns Array<WithFaceExpressions<WithFaceLandmarks<WithFaceDetection<{}>>>>:
const detectionsWithExpressions = await faceapi.detectAllFaces(input).withFaceLandmarks().withFaceExpressions()Detect the face with the highest confidence score in an image + recognize the face expressions for that face. Returns WithFaceExpressions<WithFaceLandmarks<WithFaceDetection<{}>>> | undefined:
const detectionWithExpressions = await faceapi.detectSingleFace(input).withFaceLandmarks().withFaceExpressions()You can also skip .withFaceLandmarks(), which will skip the face alignment step (less stable accuracy):
Detect all faces without face alignment + recognize face expressions of each face. Returns Array<WithFaceExpressions<WithFaceDetection<{}>>>:
const detectionsWithExpressions = await faceapi.detectAllFaces(input).withFaceExpressions()Detect the face with the highest confidence score without face alignment + recognize the face expression for that face. Returns WithFaceExpressions<WithFaceDetection<{}>> | undefined:
const detectionWithExpressions = await faceapi.detectSingleFace(input).withFaceExpressions()Age Estimation and Gender Recognition
Age estimation and gender recognition from detected faces can be done as follows:
Detect all faces in an image + estimate age and recognize gender of each face. Returns Array<WithAge<WithGender<WithFaceLandmarks<WithFaceDetection<{}>>>>>:
const detectionsWithAgeAndGender = await faceapi.detectAllFaces(input).withFaceLandmarks().withAgeAndGender()Detect the face with the highest confidence score in an image + estimate age and recognize gender for that face. Returns WithAge<WithGender<WithFaceLandmarks<WithFaceDetection<{}>>>> | undefined:
const detectionWithAgeAndGender = await faceapi.detectSingleFace(input).withFaceLandmarks().withAgeAndGender()You can also skip .withFaceLandmarks(), which will skip the face alignment step (less stable accuracy):
Detect all faces without face alignment + estimate age and recognize gender of each face. Returns Array<WithAge<WithGender<WithFaceDetection<{}>>>>:
const detectionsWithAgeAndGender = await faceapi.detectAllFaces(input).withAgeAndGender()Detect the face with the highest confidence score without face alignment + estimate age and recognize gender for that face. Returns WithAge<WithGender<WithFaceDetection<{}>>> | undefined:
const detectionWithAgeAndGender = await faceapi.detectSingleFace(input).withAgeAndGender()Composition of Tasks
Tasks can be composed as follows:
// all faces
await faceapi.detectAllFaces(input)
await faceapi.detectAllFaces(input).withFaceExpressions()
await faceapi.detectAllFaces(input).withFaceLandmarks()
await faceapi.detectAllFaces(input).withFaceLandmarks().withFaceExpressions()
await faceapi.detectAllFaces(input).withFaceLandmarks().withFaceExpressions().withFaceDescriptors()
await faceapi.detectAllFaces(input).withFaceLandmarks().withAgeAndGender().withFaceDescriptors()
await faceapi.detectAllFaces(input).withFaceLandmarks().withFaceExpressions().withAgeAndGender().withFaceDescriptors()

// single face
await faceapi.detectSingleFace(input)
await faceapi.detectSingleFace(input).withFaceExpressions()
await faceapi.detectSingleFace(input).withFaceLandmarks()
await faceapi.detectSingleFace(input).withFaceLandmarks().withFaceExpressions()
await faceapi.detectSingleFace(input).withFaceLandmarks().withFaceExpressions().withFaceDescriptor()
await faceapi.detectSingleFace(input).withFaceLandmarks().withAgeAndGender().withFaceDescriptor()
await faceapi.detectSingleFace(input).withFaceLandmarks().withFaceExpressions().withAgeAndGender().withFaceDescriptor()
Face Recognition by Matching Descriptors
To perform face recognition, one can use faceapi.FaceMatcher to compare reference face descriptors to query face descriptors.
First, we initialize the FaceMatcher with the reference data, for example we can simply detect faces in a referenceImage and match the descriptors of the detected faces to faces of subsequent images:
const results = await faceapi
  .detectAllFaces(referenceImage)
  .withFaceLandmarks()
  .withFaceDescriptors()

if (!results.length) {
  return
}

// create FaceMatcher with automatically assigned labels
// from the detection results for the reference image
const faceMatcher = new faceapi.FaceMatcher(results)
Now we can recognize a persons face shown in queryImage1:
const singleResult = await faceapi
  .detectSingleFace(queryImage1)
  .withFaceLandmarks()
  .withFaceDescriptor()

if (singleResult) {
  const bestMatch = faceMatcher.findBestMatch(singleResult.descriptor)
  console.log(bestMatch.toString())
}
Or we can recognize all faces shown in queryImage2:
const results = await faceapi
  .detectAllFaces(queryImage2)
  .withFaceLandmarks()
  .withFaceDescriptors()

results.forEach(fd => {
  const bestMatch = faceMatcher.findBestMatch(fd.descriptor)
  console.log(bestMatch.toString())
})
You can also create labeled reference descriptors as follows:
const labeledDescriptors = [
  new faceapi.LabeledFaceDescriptors(
    'obama',
    [descriptorObama1, descriptorObama2]
  ),
  new faceapi.LabeledFaceDescriptors(
    'trump',
    [descriptorTrump]
  )
]

const faceMatcher = new faceapi.FaceMatcher(labeledDescriptors)
Displaying Detection Results
Preparing the overlay canvas:
const displaySize = { width: input.width, height: input.height }
// resize the overlay canvas to the input dimensions
const canvas = document.getElementById('overlay')
faceapi.matchDimensions(canvas, displaySize)
face-api.js predefines some highlevel drawing functions, which you can utilize:
/* Display detected face bounding boxes */
const detections = await faceapi.detectAllFaces(input)
// resize the detected boxes in case your displayed image has a different size than the original
const resizedDetections = faceapi.resizeResults(detections, displaySize)
// draw detections into the canvas
faceapi.draw.drawDetections(canvas, resizedDetections)

/* Display face landmarks */
const detectionsWithLandmarks = await faceapi
  .detectAllFaces(input)
  .withFaceLandmarks()
// resize the detected boxes and landmarks in case your displayed image has a different size than the original
const resizedResults = faceapi.resizeResults(detectionsWithLandmarks, displaySize)
// draw detections into the canvas
faceapi.draw.drawDetections(canvas, resizedResults)
// draw the landmarks into the canvas
faceapi.draw.drawFaceLandmarks(canvas, resizedResults)


/* Display face expression results */
const detectionsWithExpressions = await faceapi
  .detectAllFaces(input)
  .withFaceLandmarks()
  .withFaceExpressions()
// resize the detected boxes and landmarks in case your displayed image has a different size than the original
const resizedResults = faceapi.resizeResults(detectionsWithExpressions, displaySize)
// draw detections into the canvas
faceapi.draw.drawDetections(canvas, resizedResults)
// draw a textbox displaying the face expressions with minimum probability into the canvas
const minProbability = 0.05
faceapi.draw.drawFaceExpressions(canvas, resizedResults, minProbability)
You can also draw boxes with custom text (DrawBox):
const box = { x: 50, y: 50, width: 100, height: 100 }
// see DrawBoxOptions below
const drawOptions = {
  label: 'Hello I am a box!',
  lineWidth: 2
}
const drawBox = new faceapi.draw.DrawBox(box, drawOptions)
drawBox.draw(document.getElementById('myCanvas'))
DrawBox drawing options:
export interface IDrawBoxOptions {
  boxColor?: string
  lineWidth?: number
  drawLabelOptions?: IDrawTextFieldOptions
  label?: string
}
Finally you can draw custom text fields (DrawTextField):
const text = [
  'This is a textline!',
  'This is another textline!'
]
const anchor = { x: 200, y: 200 }
// see DrawTextField below
const drawOptions = {
  anchorPosition: 'TOP_LEFT',
  backgroundColor: 'rgba(0, 0, 0, 0.5)'
}
const drawBox = new faceapi.draw.DrawTextField(text, anchor, drawOptions)
drawBox.draw(document.getElementById('myCanvas'))
DrawTextField drawing options:
export interface IDrawTextFieldOptions {
  anchorPosition?: AnchorPosition
  backgroundColor?: string
  fontColor?: string
  fontSize?: number
  fontStyle?: string
  padding?: number
}

export enum AnchorPosition {
  TOP_LEFT = 'TOP_LEFT',
  TOP_RIGHT = 'TOP_RIGHT',
  BOTTOM_LEFT = 'BOTTOM_LEFT',
  BOTTOM_RIGHT = 'BOTTOM_RIGHT'
}
Face Detection Options
SsdMobilenetv1Options
export interface ISsdMobilenetv1Options {
  // minimum confidence threshold
  // default: 0.5
  minConfidence?: number

  // maximum number of faces to return
  // default: 100
  maxResults?: number
}

// example
const options = new faceapi.SsdMobilenetv1Options({ minConfidence: 0.8 })
TinyFaceDetectorOptions
export interface ITinyFaceDetectorOptions {
  // size at which image is processed, the smaller the faster,
  // but less precise in detecting smaller faces, must be divisible
  // by 32, common sizes are 128, 160, 224, 320, 416, 512, 608,
  // for face tracking via webcam I would recommend using smaller sizes,
  // e.g. 128, 160, for detecting smaller faces use larger sizes, e.g. 512, 608
  // default: 416
  inputSize?: number

  // minimum confidence threshold
  // default: 0.5
  scoreThreshold?: number
}

// example
const options = new faceapi.TinyFaceDetectorOptions({ inputSize: 320 })
Utility Classes
IBox
export interface IBox {
  x: number
  y: number
  width: number
  height: number
}
IFaceDetection
export interface IFaceDetection {
  score: number
  box: Box
}
IFaceLandmarks
export interface IFaceLandmarks {
  positions: Point[]
  shift: Point
}
WithFaceDetection
export type WithFaceDetection<TSource> = TSource & {
  detection: FaceDetection
}
WithFaceLandmarks
export type WithFaceLandmarks<TSource> = TSource & {
  unshiftedLandmarks: FaceLandmarks
  landmarks: FaceLandmarks
  alignedRect: FaceDetection
}
WithFaceDescriptor
export type WithFaceDescriptor<TSource> = TSource & {
  descriptor: Float32Array
}
WithFaceExpressions
export type WithFaceExpressions<TSource> = TSource & {
  expressions: FaceExpressions
}
WithAge
export type WithAge<TSource> = TSource & {
  age: number
}
WithGender
export type WithGender<TSource> = TSource & {
  gender: Gender
  genderProbability: number
}

export enum Gender {
  FEMALE = 'female',
  MALE = 'male'
}
Other Useful Utility
Using the Low Level API
Instead of using the high level API, you can directly use the forward methods of each neural network:
const detections1 = await faceapi.ssdMobilenetv1(input, options)
const detections2 = await faceapi.tinyFaceDetector(input, options)
const landmarks1 = await faceapi.detectFaceLandmarks(faceImage)
const landmarks2 = await faceapi.detectFaceLandmarksTiny(faceImage)
const descriptor = await faceapi.computeFaceDescriptor(alignedFaceImage)
Extracting a Canvas for an Image Region
const regionsToExtract = [
  new faceapi.Rect(0, 0, 100, 100)
]
// actually extractFaces is meant to extract face regions from bounding boxes
// but you can also use it to extract any other region
const canvases = await faceapi.extractFaces(input, regionsToExtract)
Euclidean Distance
// ment to be used for computing the euclidean distance between two face descriptors
const dist = faceapi.euclideanDistance([0, 0], [0, 10])
console.log(dist) // 10
Retrieve the Face Landmark Points and Contours
const landmarkPositions = landmarks.positions

// or get the positions of individual contours,
// only available for 68 point face ladnamrks (FaceLandmarks68)
const jawOutline = landmarks.getJawOutline()
const nose = landmarks.getNose()
const mouth = landmarks.getMouth()
const leftEye = landmarks.getLeftEye()
const rightEye = landmarks.getRightEye()
const leftEyeBbrow = landmarks.getLeftEyeBrow()
const rightEyeBrow = landmarks.getRightEyeBrow()
Fetch and Display Images from an URL
<img id="myImg" src="">const image = await faceapi.fetchImage('/images/example.png')
console.log(image instanceof HTMLImageElement) // true
// displaying the fetched image content
const myImg = document.getElementById('myImg')
myImg.src = image.srcFetching JSON
const json = await faceapi.fetchJson('/files/example.json')Creating an Image Picker
<img id="myImg" src="">
<input id="myFileUpload" type="file" onchange="uploadImage()" accept=".jpg, .jpeg, .png">
async function uploadImage() {
const imgFile = document.getElementById('myFileUpload').files[0]
// create an HTMLImageElement from a Blob
const img = await faceapi.bufferToImage(imgFile)
document.getElementById('myImg').src = img.src
}Creating a Canvas Element from an Image or Video Element
<img id="myImg" src="images/example.png" />
<video id="myVideo" src="media/example.mp4" />
const canvas1 = faceapi.createCanvasFromMedia(document.getElementById('myImg'))
const canvas2 = faceapi.createCanvasFromMedia(document.getElementById('myVideo'))Available Models
Face Detection Models
SSD Mobilenet V1
For face detection, this project implements a SSD (Single Shot Multibox Detector) based on MobileNetV1. The neural net will compute the locations of each face in an image and will return the bounding boxes together with it's probability for each face. This face detector is aiming towards obtaining high accuracy in detecting face bounding boxes instead of low inference time. The size of the quantized model is about 5.4 MB (ssd_mobilenetv1_model).
The face detection model has been trained on the WIDERFACE dataset and the weights are provided by yeephycho in this repo.
Tiny Face Detector
The Tiny Face Detector is a very performant, realtime face detector, which is much faster, smaller and less resource consuming compared to the SSD Mobilenet V1 face detector, in return it performs slightly less well on detecting small faces. This model is extremely mobile and web friendly, thus it should be your GO-TO face detector on mobile devices and resource limited clients. The size of the quantized model is only 190 KB (tiny_face_detector_model).
The face detector has been trained on a custom dataset of ~14K images labeled with bounding boxes. Furthermore the model has been trained to predict bounding boxes, which entirely cover facial feature points, thus it in general produces better results in combination with subsequent face landmark detection than SSD Mobilenet V1.
This model is basically an even tinier version of Tiny Yolo V2, replacing the regular convolutions of Yolo with depthwise separable convolutions. Yolo is fully convolutional, thus can easily adapt to different input image sizes to trade off accuracy for performance (inference time).
68 Point Face Landmark Detection Models
This package implements a very lightweight and fast, yet accurate 68 point face landmark detector. The default model has a size of only 350kb (face_landmark_68_model) and the tiny model is only 80kb (face_landmark_68_tiny_model). Both models employ the ideas of depthwise separable convolutions as well as densely connected blocks. The models have been trained on a dataset of ~35k face images labeled with 68 face landmark points.
Face Recognition Model
For face recognition, a ResNet-34 like architecture is implemented to compute a face descriptor (a feature vector with 128 values) from any given face image, which is used to describe the characteristics of a persons face. The model is not limited to the set of faces used for training, meaning you can use it for face recognition of any person, for example yourself. You can determine the similarity of two arbitrary faces by comparing their face descriptors, for example by computing the euclidean distance or using any other classifier of your choice.
The neural net is equivalent to the FaceRecognizerNet used in face-recognition.js and the net used in the dlib face recognition example. The weights have been trained by davisking and the model achieves a prediction accuracy of 99.38% on the LFW (Labeled Faces in the Wild) benchmark for face recognition.
The size of the quantized model is roughly 6.2 MB (face_recognition_model).
Face Expression Recognition Model
The face expression recognition model is lightweight, fast and provides reasonable accuracy. The model has a size of roughly 310kb and it employs depthwise separable convolutions and densely connected blocks. It has been trained on a variety of images from publicly available datasets as well as images scraped from the web. Note, that wearing glasses might decrease the accuracy of the prediction results.
Age and Gender Recognition Model
The age and gender recognition model is a multitask network, which employs a feature extraction layer, an age regression layer and a gender classifier. The model has a size of roughly 420kb and the feature extractor employs a tinier but very similar architecture to Xception.
This model has been trained and tested on the following databases with an 80/20 train/test split each: UTK, FGNET, Chalearn, Wiki, IMDB*, CACD*, MegaAge, MegaAge-Asian. The * indicates, that these databases have been algorithmically cleaned up, since the initial databases are very noisy.
Total Test Results
Total MAE (Mean Age Error): 4.54
Total Gender Accuracy: 95%
Test results for each database
The - indicates, that there are no gender labels available for these databases.
| Database | UTK | FGNET | Chalearn | Wiki | IMDB* | CACD* | MegaAge | MegaAge-Asian |
|---|---|---|---|---|---|---|---|---|
| MAE | 5.25 | 4.23 | 6.24 | 6.54 | 3.63 | 3.20 | 6.23 | 4.21 |
| Gender Accuracy | 0.93 | - | 0.94 | 0.95 | - | 0.97 | - | - |
Test results for different age category groups
| Age Range | 0 - 3 | 4 - 8 | 9 - 18 | 19 - 28 | 29 - 40 | 41 - 60 | 60 - 80 | 80+ |
|---|---|---|---|---|---|---|---|---|
| MAE | 1.52 | 3.06 | 4.82 | 4.99 | 5.43 | 4.94 | 6.17 | 9.91 |
| Gender Accuracy | 0.69 | 0.80 | 0.88 | 0.96 | 0.97 | 0.97 | 0.96 | 0.9 |