
Package Exports
This package does not declare an exports field, so the exports above have been automatically detected and optimized by JSPM instead. If any package subpath is missing, it is recommended to post an issue to the original package (node-red-contrib-button-events) to support the "exports" field. If that is not possible, create a JSPM override to customize the exports field for this package.
Readme
node-red-contrib-button-events
A Node-RED node to send events based on button actions.
I would really like to thank:
- Bryan Nielsen for the tremendous support when integrating his button-events library into Node-RED!
- Andreas Lindegger for support of triple and quadruple clicks, and providing me the calculations of the calibration feature.
Install
Run the following npm command in your Node-RED user directory (typically ~/.node-red):
npm install bartbutenaers/node-red-contrib-button-eventsSupport my Node-RED developments
Please buy my wife a coffee to keep her happy, while I am busy developing Node-RED stuff for you ...

Node Usage
REMARK: the easiest way to get started is by doing a calibration (see "Calibration" section below) to determine the timing values automatically, before you start using this node!
When the value of a button changes (high or low), this node will determine the kind of even that has happened:
- A single click
- A double click
- A triple click
- A quadruple click
- A long press (i.e. keeping the button pressed)
- A single click followed by a long press
- A double click followed by a long press
- A triple click followed by a long press
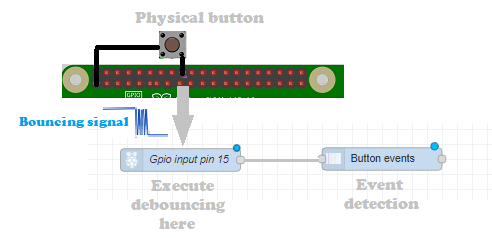
Physical buttons can be read in many different ways, but a common case for Node-RED is (via an optocoupler) to the GPIO input pin of a Raspberry Pi:
- Use a pull-up resistor to make sure the (idle) signal is
1, and the button can pull the signal to0(gnd). - Use a pull-down resistor to make sure the (idle) signal is
0, and the button can pull the signal1(vcc).
Note that the buttons will not switch between 0 and 1 perfectly, but the signal will toggle a number of times between both values. This is called bouncing. While this node offers a very basic debouncing mechanism (by ignoring input messages during the debounce time interval), it might be advised to use the debounce mechanism of the gpio-in node itself (by setting the debounce time interval to zero). Indeed otherwise all the switch values will travel through Node-RED from the gpio-in node to this node, and we would throw them away here. Not optimal from a performance point of view ...
When a button value arrives in the specified input message field, then this node will determine which kind of event has occured on the button and send the event type in the specified output message field:
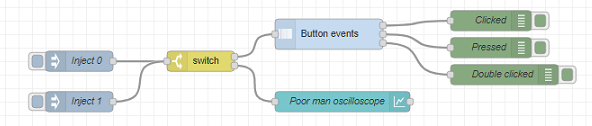
[{"id":"e94468b6.358e18","type":"debug","z":"2203d76d.b17558","name":"Clicked","active":true,"tosidebar":true,"console":false,"tostatus":false,"complete":"true","targetType":"full","statusVal":"","statusType":"auto","x":860,"y":180,"wires":[]},{"id":"4bc6d6f0.115498","type":"inject","z":"2203d76d.b17558","name":"Inject 0","props":[{"p":"payload"},{"p":"topic","vt":"str"}],"repeat":"","crontab":"","once":false,"onceDelay":0.1,"topic":"ZERO","payload":"0","payloadType":"num","x":250,"y":240,"wires":[["ecd423af.746cd"]]},{"id":"c6658632.447978","type":"button-events","z":"2203d76d.b17558","name":"","outputs":3,"inputField":"payload","inputFieldType":"msg","outputField":"payload","outputFieldType":"msg","downValue":"0","downValueType":"num","upValue":"1","upValueType":"num","idleValue":"1","clickedInterval":"2000","pressedInterval":"5000","debounceInterval":"200","events":[{"type":"clicked"},{"type":"pressed"},{"type":"double_clicked"}],"x":620,"y":200,"wires":[["e94468b6.358e18"],["625d6be5.811694"],["b0bd0d59.bc7cf"]]},{"id":"9130e7a8.87df08","type":"inject","z":"2203d76d.b17558","name":"Inject 1","props":[{"p":"payload"},{"p":"topic","vt":"str"}],"repeat":"","crontab":"","once":false,"onceDelay":0.1,"topic":"ONE","payload":"1","payloadType":"num","x":250,"y":300,"wires":[["ecd423af.746cd"]]},{"id":"3ac673fa.12ef9c","type":"ui_chart","z":"2203d76d.b17558","name":"Poor man oscilloscope","group":"27b65cf1.24c8e4","order":3,"width":0,"height":0,"label":"Poor man oscilloscope","chartType":"line","legend":"false","xformat":"HH:mm:ss","interpolate":"step","nodata":"","dot":false,"ymin":"0","ymax":"2","removeOlder":1,"removeOlderPoints":"","removeOlderUnit":"3600","cutout":0,"useOneColor":false,"useUTC":false,"colors":["#1f77b4","#aec7e8","#ff7f0e","#2ca02c","#98df8a","#d62728","#ff9896","#9467bd","#c5b0d5"],"useOldStyle":false,"outputs":1,"x":640,"y":300,"wires":[[]]},{"id":"ecd423af.746cd","type":"switch","z":"2203d76d.b17558","name":"","property":"payload","propertyType":"msg","rules":[{"t":"lt","v":"2","vt":"num"},{"t":"lt","v":"2","vt":"num"}],"checkall":"true","repair":false,"outputs":2,"x":430,"y":240,"wires":[["c6658632.447978"],["3ac673fa.12ef9c"]]},{"id":"b0bd0d59.bc7cf","type":"debug","z":"2203d76d.b17558","name":"Double clicked","active":true,"tosidebar":true,"console":false,"tostatus":false,"complete":"true","targetType":"full","statusVal":"","statusType":"auto","x":880,"y":260,"wires":[]},{"id":"625d6be5.811694","type":"debug","z":"2203d76d.b17558","name":"Pressed","active":true,"tosidebar":true,"console":false,"tostatus":false,"complete":"true","targetType":"full","statusVal":"","statusType":"auto","x":860,"y":220,"wires":[]},{"id":"27b65cf1.24c8e4","type":"ui_group","z":"","name":"HLS demo","tab":"787ed714.674938","order":1,"disp":true,"width":"12","collapse":false},{"id":"787ed714.674938","type":"ui_tab","z":"","name":"Code","icon":"dashboard","order":1,"disabled":false,"hidden":false}]The detected event name will also be displayed in the status of the node.
REMARK: that you need to specify (in the config screen) for every required event, on which output it needs to be sent! So by default this node won't have any outputs.
Calibration
In most cases the default timing settings will be fine. However it is possible to change the default settings. Since it is not always easy to determine timing settings, this node offers a calibration feature. This way you can determine timing values for your specific usage.
Note that it is NOT the intension to do a calibration for each separate kind of event (single click, double click, ...). Instead the calbration is ONLY used to determine how long this node needs to wait for signal changes, before it is allowed analyze the signal changes and send an output message. The calibration will measure both the down and up times, to calculate the average pressing and release times.
As a result:
If you click slowly during calibration, then the analysis time interval will be longer afterwards when using this node to analyze button events (which means the output messages with the events will have a larger reaction time):

If you click fast during calibration, then the analysis time interval will be shorter afterwards when using this node to analyze button events (which means the output messages with the events will have a smaller reaction time):

Calibration procedure:
- Import the folowing flow

[{"id":"6ebfda0f85a08768","type":"button-events","z":"6063841c422bab25","name":"","outputs":1,"inputField":"payload","inputFieldType":"msg","outputField":"payload","outputFieldType":"msg","downValue":"0","downValueType":"num","upValue":"1","upValueType":"num","idleValue":"1","clickedInterval":200,"pressedInterval":200,"debounceInterval":30,"events":[{"type":"calibration"}],"x":900,"y":520,"wires":[["06d7b9c99cf0e9cc"]]},{"id":"3fb1bc7ff4d94f8a","type":"inject","z":"6063841c422bab25","name":"start calibration","props":[{"p":"topic","vt":"str"}],"repeat":"","crontab":"","once":false,"onceDelay":0.1,"topic":"start_calibration","x":660,"y":520,"wires":[["6ebfda0f85a08768"]]},{"id":"d181c5bd13d8ecb8","type":"inject","z":"6063841c422bab25","name":"stop calibration","props":[{"p":"topic","vt":"str"}],"repeat":"","crontab":"","once":false,"onceDelay":0.1,"topic":"stop_calibration","x":660,"y":640,"wires":[["6ebfda0f85a08768"]]},{"id":"a5b7d28af974a2a3","type":"inject","z":"6063841c422bab25","name":"0","props":[{"p":"payload"}],"repeat":"","crontab":"","once":false,"onceDelay":0.1,"topic":"","payload":"0","payloadType":"num","x":690,"y":560,"wires":[["6ebfda0f85a08768"]]},{"id":"d979a26f00068083","type":"inject","z":"6063841c422bab25","name":"1","props":[{"p":"payload"}],"repeat":"","crontab":"","once":false,"onceDelay":0.1,"topic":"","payload":"1","payloadType":"num","x":690,"y":600,"wires":[["6ebfda0f85a08768"]]},{"id":"06d7b9c99cf0e9cc","type":"debug","z":"6063841c422bab25","name":"Calibration output","active":true,"tosidebar":true,"console":false,"tostatus":false,"complete":"payload","targetType":"msg","statusVal":"","statusType":"auto","x":1150,"y":520,"wires":[]}]Start the calibration by injecting a message with topic "start_calibration".
Repeat the button actions at least 10 times to get a reliable (average) calibration result. Do this in the slowest speed you would like to detec multiclicks. Perform the "time_click" action.
Stop the calibration by injecting a message with topic "stop_calibration". Note: the calibration will stop automatically after 3 minutes anyway, is to avoid confusion when you would forget to stop the calibration.
An output message will appear in the Debug sidebar, containing the calculated calibration settings.
Apply those settings to this node by copying the calibration results into the config screen of this node:

Note that after 3 minutes of inactivity (i.e. no button clicks), the calibration will automatically stop. This is required to avoid confusing when the calibration wouldn't be stopped explicit!
Timelines
The following timelines show how the button input is watched in the specified time intervals, and when which events are send in the output message. The low-level events (which normally won't be used) are shown in blue, while the important user intent events are shown in red.
Single-click timeline
When the button is clicked and released fast (i.e. released within the "Pressed" time interval), then the clicked event will be send:

Double-click timeline
When the button is clicked and released fast (i.e. released within the "Pressed" time interval), but it is clicked again immediately afterwards (i.e. clicked again within the "Clicked" time interval). Then the double-clicked event will be send:

Triple-click timeline
When the button is clicked and released (i.e. released each time within the "Pressed" time interval ), but it is clicked again immediately afterwards two times (i.e. clicked again within the "Clicked" time interval ). Then the triple-clicked event will be send.

Quadruple-click timeline
When the button is clicked and released fast (i.e. released within the "Pressed" time interval ), but it is clicked again immediately afterwards tree times (i.e. clicked again within the "Clicked" time interval ). Then the quadruple-clicked event will be send.

Long-press timeline
When the button is clicked and kept down some time (i.e. released after "Pressed" time interval), then the released event will be send:

Clicked-pressed timeline
When the button is clicked and released fast (i.e. released within the "Pressed" time interval), but it is long clicked immediately afterwards (i.e. long pressed again within the "Clicked" time interval). Then the clicked-pressed event will be send:

Double-clicked-pressed timeline
When the button is clicked and released fast two times (i.e. released within the "Pressed" time interval ), but it is long clicked immediately afterwards (i.e. long pressed again within the "Clicked" time interval ). Then the double_clicked_pressed event will be send.

Triple-clicked-pressed timeline
When the button is clicked and released fast three times (i.e. released within the "Pressed" time interval ), but it is long clicked immediately afterwards (i.e. long pressed again within the "Clicked" time interval ). Then the triple_clicked_pressed event will be send.

Background Information
For a deeper understanding of the click mechanism the folowing finit-state machine diagram shows the logic behind.

Node properties
Timings
Defines the timings of the click detections in a configuration node. The same configuration node can be used over several "button-events" nodes to have the same behaver all over again.
Input
Specifies the input message field where the input value (0 or 1) will arrive.
Output
Specifies the output message field where the detected event type will be stored. When the Output field differs from the Input field, the original input message data will be kept intact and the message will be extended with the event type.
Down value
Specifies the value that will arrive when the button is down (i.e. clicked or pressed). For example for a GPIO input with a pull-up resistor this will be 0, or 1 in case of a pull-down resistor.
Up value
Specifies the value that will arrive when the button is up (i.e. in normal status). For example for a GPIO input with a pull-up resistor this will be 1, or 0 in case of a pull-down resistor.
Events
Add all events in the list, for which an output needs to be sent (when the event occurs). The first 5 events indicate user intent event types:
clicked: when a button is pressed and released rapidly one time.double_clicked: when a button is pressed and released rapidly two times.triple_clicked: when a button is pressed and released rapidly tree times.quadruple_clicked: when a button is pressed and released rapidly four times.pressed: when a button is pressed and held down. This will be followed with areleasedevent, as soon as the button is released.clicked_pressed: if a click is quickly followed by pressing and holding the button, then a clicked_pressed event will be emitted. This will be followed by areleasedevent, as soon as the button is released.double_clicked_pressed: if a double click is quickly followed by pressing and holding the button, then a double_clicked_pressed event will be emitted. This will be followed by areleasedevent, as soon as the button is released.triple_clicked_pressed: if a triple click is quickly followed by pressing and holding the button, then a triple_clicked_pressed event will be emitted. This will be followed by areleasedevent, as soon as the button is released.released: when the pressed button is released.
The next 3 events indicate low-level event types:
button_changed: when a button is pressed or released.button_press: when a button is pressed.button_release: When a button is released.
Note that those low level events will only be useful in special circumstances.
The last event shows the calibration output:
calibration: Shows informations from a calibration
Configuration Node properties
To define the timings of a click-action a configuration node is needed with the folowing properties.
REMARK: The timings can be defined manualy or can be measured by the calibration procedure as mentioned above.
Clicked
Specifies the interval (in milliseconds) to wait - after a button is released - before generating a clicked event. When a second click arrives within the "Clicked" interval, then both clicks will be combined to a double-click event.
Pressed
Specifies the interval (in milliseconds) to wait - after a button is pressed - before generating a pressed event. When the button is not being released within this interval, the button is kept down, e.g. for dimming a light.
Debounce
Specifies the interval (in milliseconds) to wait before considering the input signal to have stabilized. Within this time interval, all new input messages that arrive will be ignored.