Package Exports
This package does not declare an exports field, so the exports above have been automatically detected and optimized by JSPM instead. If any package subpath is missing, it is recommended to post an issue to the original package (@al76/tools-and-spec-workflow-mcp) to support the "exports" field. If that is not possible, create a JSPM override to customize the exports field for this package.
Readme
Spec Workflow MCP

A Model Context Protocol (MCP) server that provides structured spec-driven development workflow tools for AI-assisted software development, featuring a real-time web dashboard and VSCode extension for monitoring and managing your project's progress directly in your development environment.
📺 Showcase
🔄 Approval System in Action
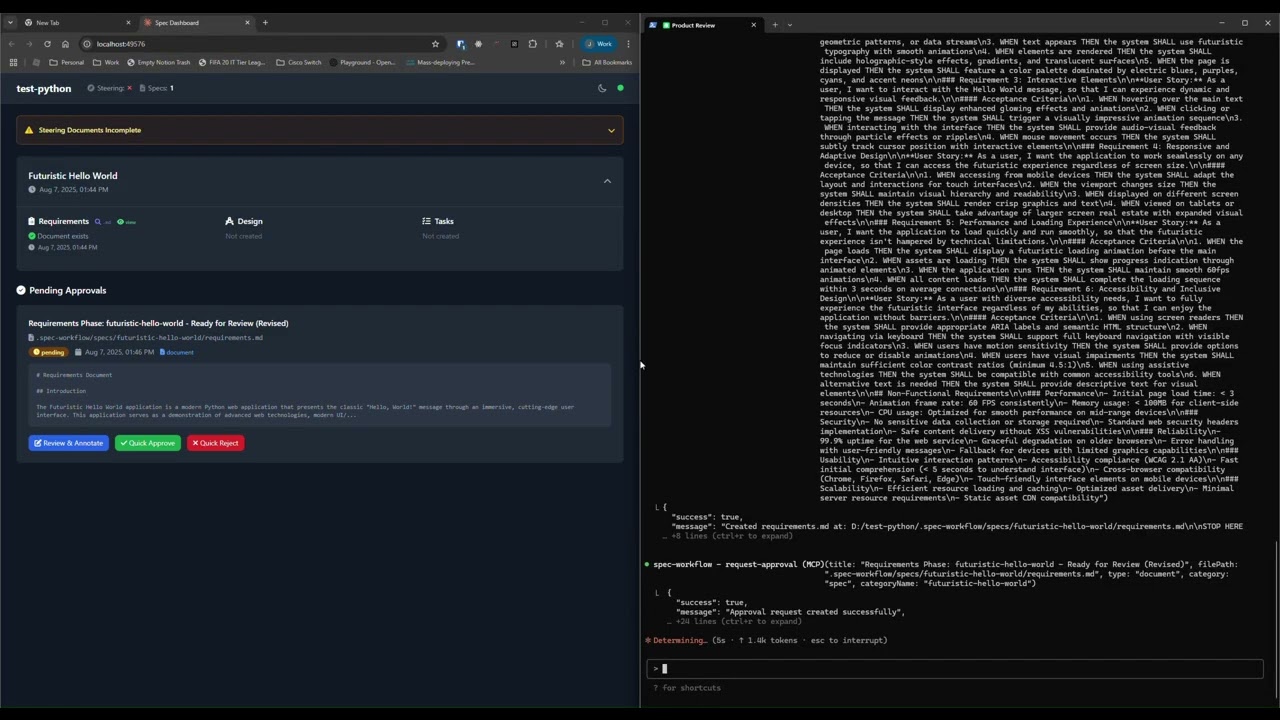
See how the approval system works: create documents, request approval through the dashboard, provide feedback, and track revisions.
📊 Dashboard & Spec Management
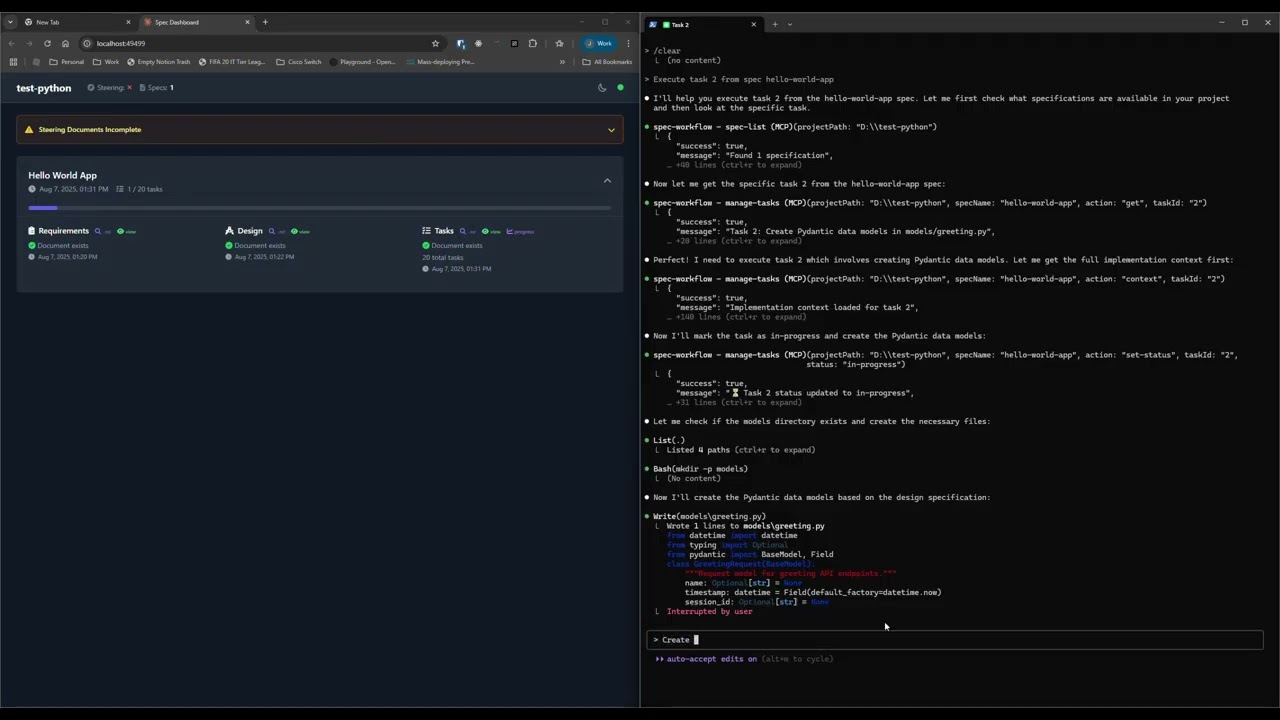
Explore the real-time dashboard: view specs, track progress, navigate documents, and monitor your development workflow.
☕ Support This Project

Features
- Structured Development Workflow - Sequential spec creation (Requirements → Design → Tasks)
- Real-Time Web Dashboard - Monitor specs, tasks, and progress with live updates
- VSCode Extension - Integrated sidebar dashboard for developers working in VSCode
- Document Management - View and manage all spec documents from dashboard or extension
- Archive System - Organize completed specs to keep active projects clean
- Task Progress Tracking - Visual progress bars and detailed task status
- Approval Workflow - Complete approval process with approve, reject, and revision requests
- Steering Documents - Project vision, technical decisions, and structure guidance
- Sound Notifications - Configurable audio alerts for approvals and task completions
- Bug Workflow - Complete bug reporting and resolution tracking
- Template System - Pre-built templates for all document types
- Cross-Platform - Works on Windows, macOS, and Linux
🌍 Supported Languages
The entire interface (dashboard, VSCode extension) is available in:
- 🇺🇸 English (en)
- 🇯🇵 Japanese (ja) - 日本語
- 🇨🇳 Chinese (zh) - 中文
- 🇪🇸 Spanish (es) - Español
- 🇧🇷 Portuguese (pt) - Português
- 🇩🇪 German (de) - Deutsch
- 🇫🇷 French (fr) - Français
- 🇷🇺 Russian (ru) - Русский
- 🇮🇹 Italian (it) - Italiano
- 🇰🇷 Korean (ko) - 한국어
- 🇸🇦 Arabic (ar) - العربية
Language selection is available in both the dashboard and VSCode extension settings.
Quick Start
Add to your AI tool configuration (see MCP Client Setup below):
{
  "mcpServers": {
    "spec-workflow": {
      "command": "npx",
      "args": ["-y", "@auge/tools-and-spec-workflow-mcp@latest", "/path/to/your/project"]
    }
  }
}
With Auto-Started Dashboard (opens dashboard automatically with MCP server):
{
  "mcpServers": {
    "spec-workflow": {
      "command": "npx",
      "args": ["-y", "@auge/tools-and-spec-workflow-mcp@latest", "/path/to/your/project", "--AutoStartDashboard"]
    }
  }
}
With Custom Port:
{
  "mcpServers": {
    "spec-workflow": {
      "command": "npx",
      "args": ["-y", "@auge/tools-and-spec-workflow-mcp@latest", "/path/to/your/project", "--AutoStartDashboard", "--port", "3456"]
    }
  }
}
Note: Can be used without path to your project, but some MCP clients may not start the server from the current directory.
Choose your interface:
Option A: Web Dashboard (REQUIRED for CLI users)
# Dashboard only mode (uses ephemeral port)
npx -y @auge/tools-and-spec-workflow-mcp@latest /path/to/your/project --dashboard

# Dashboard only with custom port
npx -y @auge/tools-and-spec-workflow-mcp@latest /path/to/your/project --dashboard --port 3000

# View all available options
npx -y @auge/tools-and-spec-workflow-mcp@latest --help
Command-Line Options:
--help- Show comprehensive usage information and examples--dashboard- Run dashboard-only mode (no MCP server)--AutoStartDashboard- Auto-start dashboard with MCP server--port <number>- Specify dashboard port (1024-65535). Works with both--dashboardand--AutoStartDashboard--config <path>- Use custom config file instead of default location. Supports both relative and absolute paths
Configuration File:
You can configure the server using a TOML configuration file. By default, the server looks for
<project-dir>/.spec-workflow/config.toml, but you can specify a custom location using the--configflag.Example configuration:
# Project directory (defaults to current directory)
projectDir = "/path/to/your/project"

# Dashboard port (1024-65535)
port = 3456

# Auto-start dashboard with MCP server
autoStartDashboard = true

# Run dashboard-only mode
dashboardOnly = false

# Interface language (en, ja, zh, es, pt, de, fr, ru, it, ko, ar)
lang = "en"
Using Custom Config Files:
# Use custom config file
npx @auge/tools-and-spec-workflow-mcp --config ~/my-configs/spec.toml

# Custom config with dashboard
npx @auge/tools-and-spec-workflow-mcp --config ./dev-config.toml --dashboard

# CLI args still override custom config
npx @auge/tools-and-spec-workflow-mcp --config ./config.toml --port 4000
Configuration Precedence:
- Command-line arguments (highest priority)
- Custom config file (if specified with --config)
- Default config file (.spec-workflow/config.toml)
- Built-in defaults (lowest priority)
A complete example configuration file with documentation is available at
.spec-workflow/config.example.toml.Option B: VSCode Extension (Recommended for VSCode users)
Install the Spec Workflow MCP Extension from the VSCode marketplace:
- Open VSCode in your project directory containing
.spec-workflow/ - The extension automatically provides the dashboard functionality within VSCode
- Access via the Spec Workflow icon in the Activity Bar
- No separate dashboard needed - everything runs within your IDE
Extension Features:
- Integrated sidebar dashboard with real-time updates
- Archive system for organizing completed specs
- Full approval workflow with VSCode native dialogs
- Sound notifications for approvals and completions
- Editor context menu actions for approvals and comments
IMPORTANT: For CLI users, the web dashboard is mandatory. For VSCode users, the extension replaces the need for a separate web dashboard while providing the same functionality directly in your IDE.
How to Use
You can simply mention spec-workflow or whatever name you gave the MCP server in your conversation. The AI will handle the complete workflow automatically or you can use some of the example prompts below:
Creating Specs
- "Create a spec for user authentication" - Creates complete spec workflow for that feature
- "Create a spec called payment-system" - Builds full requirements → design → tasks
- "Build a spec for @prd" - Takes your existing PRD and creates the complete spec workflow from it
- "Create a spec for shopping-cart - include add to cart, quantity updates, and checkout integration" - Detailed feature spec
Getting Information
- "List my specs" - Shows all specs and their current status
- "Show me the user-auth progress" - Displays detailed progress information
Implementation
- "Execute task 1.2 in spec user-auth" - Runs a specific task from your spec
- Copy prompts from dashboard - Use the "Copy Prompt" button in the task list on your dashboard
The agent automatically handles approval workflows, task management, and guides you through each phase.
MCP Client Setup
Augment Code
Configure in your Augment settings:
{
  "mcpServers": {
    "spec-workflow": {
      "command": "npx",
      "args": ["-y", "@auge/tools-and-spec-workflow-mcp@latest", "/path/to/your/project"]
    }
  }
}
Claude Code CLI
Add to your MCP configuration:
claude mcp add spec-workflow npx @auge/tools-and-spec-workflow-mcp@latest -- /path/to/your/projectImportant Notes:
- The
-yflag bypasses npm prompts for smoother installation - The
--separator ensures the path is passed to the spec-workflow script, not to npx - Replace
/path/to/your/projectwith your actual project directory path
Alternative for Windows (if the above doesn't work):
claude mcp add spec-workflow cmd.exe /c "npx @auge/tools-and-spec-workflow-mcp@latest /path/to/your/project"Claude Desktop
Add to claude_desktop_config.json:
{
  "mcpServers": {
    "spec-workflow": {
      "command": "npx",
      "args": ["-y", "@auge/tools-and-spec-workflow-mcp@latest", "/path/to/your/project"]
    }
  }
}
Or with auto-started dashboard:
{
  "mcpServers": {
    "spec-workflow": {
      "command": "npx",
      "args": ["-y", "@auge/tools-and-spec-workflow-mcp@latest", "/path/to/your/project", "--AutoStartDashboard"]
    }
  }
}
Cline/Claude Dev
Add to your MCP server configuration:
{
  "mcpServers": {
    "spec-workflow": {
      "command": "npx",
      "args": ["-y", "@auge/tools-and-spec-workflow-mcp@latest", "/path/to/your/project"]
    }
  }
}
Continue IDE Extension
Add to your Continue configuration:
{
  "mcpServers": {
    "spec-workflow": {
      "command": "npx",
      "args": ["-y", "@auge/tools-and-spec-workflow-mcp@latest", "/path/to/your/project"]
    }
  }
}
Cursor IDE
Add to your Cursor settings (settings.json):
{
  "mcpServers": {
    "spec-workflow": {
      "command": "npx",
      "args": ["-y", "@auge/tools-and-spec-workflow-mcp@latest", "/path/to/your/project"]
    }
  }
}
OpenCode
Add to your opencode.json configuration file (either global at ~/.config/opencode/opencode.json or project-specific):
{
  "$schema": "https://opencode.ai/config.json",
  "mcp": {
    "spec-workflow": {
      "type": "local",
      "command": ["npx", "-y", "@auge/tools-and-spec-workflow-mcp@latest", "/path/to/your/project"],
      "enabled": true
    }
  }
}
Note: Replace
/path/to/your/projectwith the actual path to your project directory where you want the spec workflow to operate.
Available Tools
Workflow Guides
spec-workflow-guide- Complete guide for the spec-driven workflow processsteering-guide- Guide for creating project steering documents
Spec Management
create-spec-doc- Create/update spec documents (requirements, design, tasks)spec-list- List all specs with status informationspec-status- Get detailed status of a specific specmanage-tasks- Comprehensive task management for spec implementation
Context & Templates
get-template-context- Get markdown templates for all document typesget-steering-context- Get project steering context and guidanceget-spec-context- Get context for a specific spec
Steering Documents
create-steering-doc- Create project steering documents (product, tech, structure)
Approval System
request-approval- Request user approval for documentsget-approval-status- Check approval statusdelete-approval- Clean up completed approvals
User Interfaces
Web Dashboard
The web dashboard is a separate service for CLI users. Each project gets its own dedicated dashboard running on an ephemeral port. The dashboard provides:
- Live Project Overview - Real-time updates of specs and progress
- Document Viewer - Read requirements, design, and tasks documents
- Task Progress Tracking - Visual progress bars and task status
- Steering Documents - Quick access to project guidance
- Dark Mode - Automatically enabled for better readability
Dashboard Features
- Spec Cards - Overview of each spec with status indicators
- Document Navigation - Switch between requirements, design, and tasks
- Task Management - View task progress and copy implementation prompts
- Real-Time Updates - WebSocket connection for live project status
VSCode Extension
The VSCode extension provides all dashboard functionality directly within your IDE:
- Sidebar Integration - Access everything from the Activity Bar
- Archive Management - Switch between active and archived specs
- Native Dialogs - VSCode confirmation dialogs for all actions
- Editor Integration - Context menu actions for approvals and comments
- Sound Notifications - Configurable audio alerts
- No External Dependencies - Works entirely within VSCode
Extension Advantages for VSCode Users
- Single Environment - No need to switch between browser and IDE
- Native Experience - Uses VSCode's native UI components
- Better Integration - Context menu actions and editor integration
- Simplified Setup - No separate dashboard service required
Workflow Process
1. Project Setup (Recommended)
steering-guide → create-steering-doc (product, tech, structure)Creates foundational documents to guide your project development.
2. Feature Development
spec-workflow-guide → create-spec-doc → [review] → implementationSequential process: Requirements → Design → Tasks → Implementation
3. Implementation Support
- Use
get-spec-contextfor detailed implementation context - Use
manage-tasksto track task completion - Monitor progress via the web dashboard
File Structure
your-project/
  .spec-workflow/
    steering/
      product.md        # Product vision and goals
      tech.md          # Technical decisions
      structure.md     # Project structure guide
    specs/
      {spec-name}/
        requirements.md # What needs to be built
        design.md      # How it will be built
        tasks.md       # Implementation breakdown
    approval/
      {spec-name}/
        {document-id}.json # Approval status tracking
Development
# Install dependencies
npm install

# Build the project
npm run build

# Run in development mode (with auto-reload)
npm run dev

# Start the production server
npm start

# Clean build artifacts
npm run clean
Troubleshooting
Common Issues
Claude MCP configuration not working with project path
- Ensure you're using the correct syntax:
claude mcp add spec-workflow npx -y @auge/tools-and-spec-workflow-mcp@latest -- /path/to/your/project - The
--separator is crucial for passing the path to the script rather than to npx - Verify the path exists and is accessible
- For paths with spaces, ensure they're properly quoted in your shell
- Check the generated configuration in your
claude.jsonto ensure the path appears in theargsarray
- Ensure you're using the correct syntax:
Dashboard not starting
- Ensure you're using the
--dashboardflag when starting the dashboard service - The dashboard must be started separately from the MCP server
- Check console output for the dashboard URL and any error messages
- If using
--port, ensure the port number is valid (1024-65535) and not in use by another application
- Ensure you're using the
Approvals not working
- Verify the dashboard is running alongside the MCP server
- The dashboard is required for document approvals and task tracking
- Check that both services are pointing to the same project directory
MCP server not connecting
- Verify the file paths in your configuration are correct
- Ensure the project has been built with
npm run build - Check that Node.js is available in your system PATH
Port conflicts
- If you get a "port already in use" error, try a different port with
--port <different-number> - Use
netstat -an | find ":3000"(Windows) orlsof -i :3000(macOS/Linux) to check what's using a port - Omit the
--portparameter to automatically use an available ephemeral port
- If you get a "port already in use" error, try a different port with
Dashboard not updating
- The dashboard uses WebSockets for real-time updates
- Refresh the browser if connection is lost
- Check console for any JavaScript errors
Getting Help
- Check the Issues page for known problems
- Create a new issue using the provided templates
- Use the workflow guides within the tools for step-by-step instructions
License
GPL-3.0