Package Exports
- @tencentcloud/ai-desk-customer-wechat
- @tencentcloud/ai-desk-customer-wechat/index.js
This package does not declare an exports field, so the exports above have been automatically detected and optimized by JSPM instead. If any package subpath is missing, it is recommended to post an issue to the original package (@tencentcloud/ai-desk-customer-wechat) to support the "exports" field. If that is not possible, create a JSPM override to customize the exports field for this package.
Readme
介绍
智能客服用户端的微信小程序 UIKit。使用此 UIKit,您可以在一天内将智能客服的能力集成到您的小程序项目。极简接入,用 AI 为您的产品增收提效。
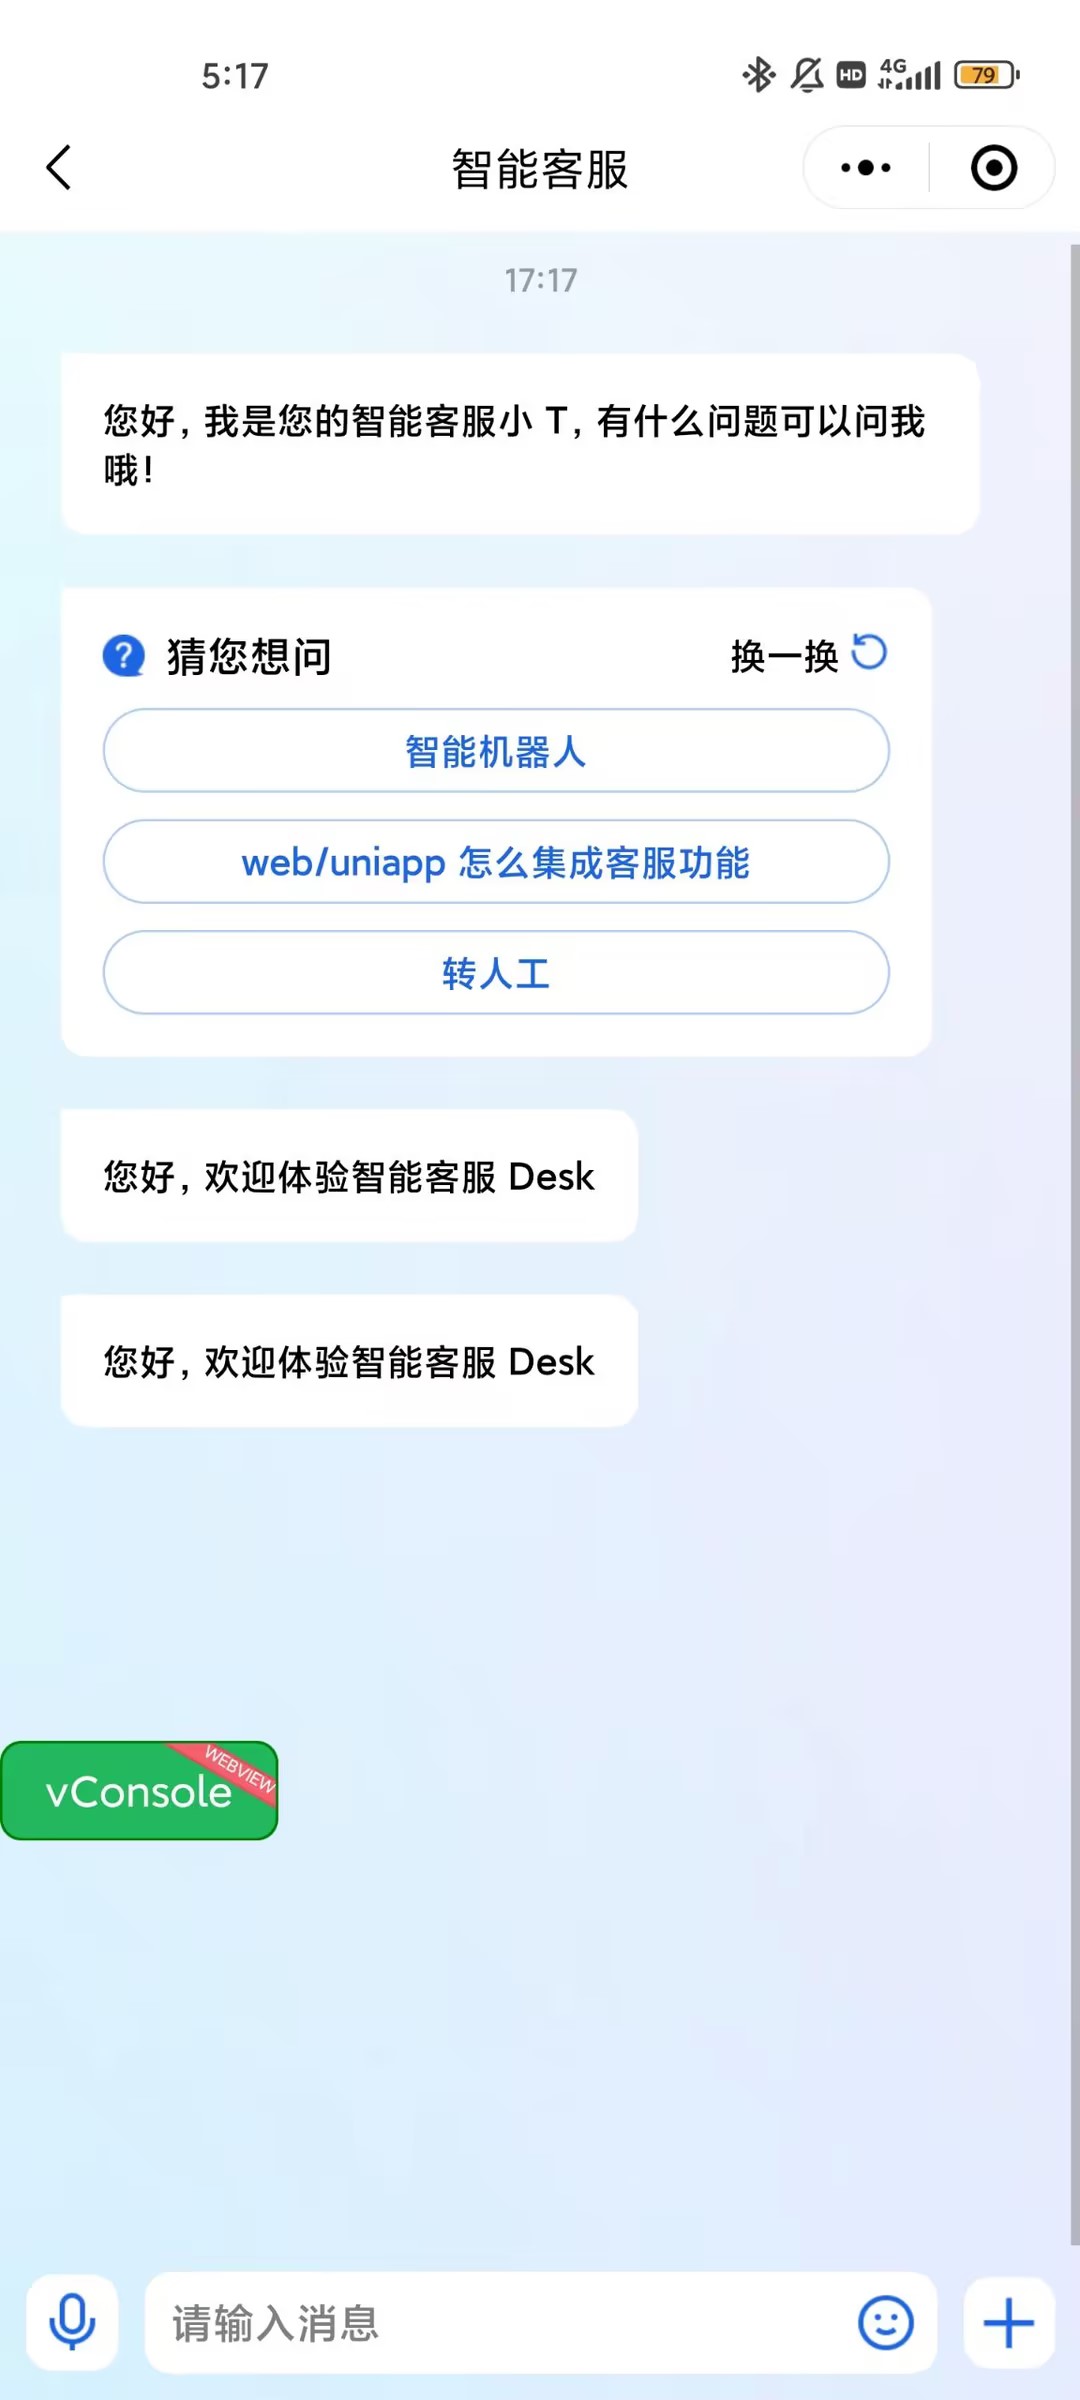
效果展示
开发环境要求
微信开发者工具
JavaScript 或 TypeScript
node(node.js ≥ 16.0.0)
npm(版本请与 node 版本匹配)
UIKit 源码集成
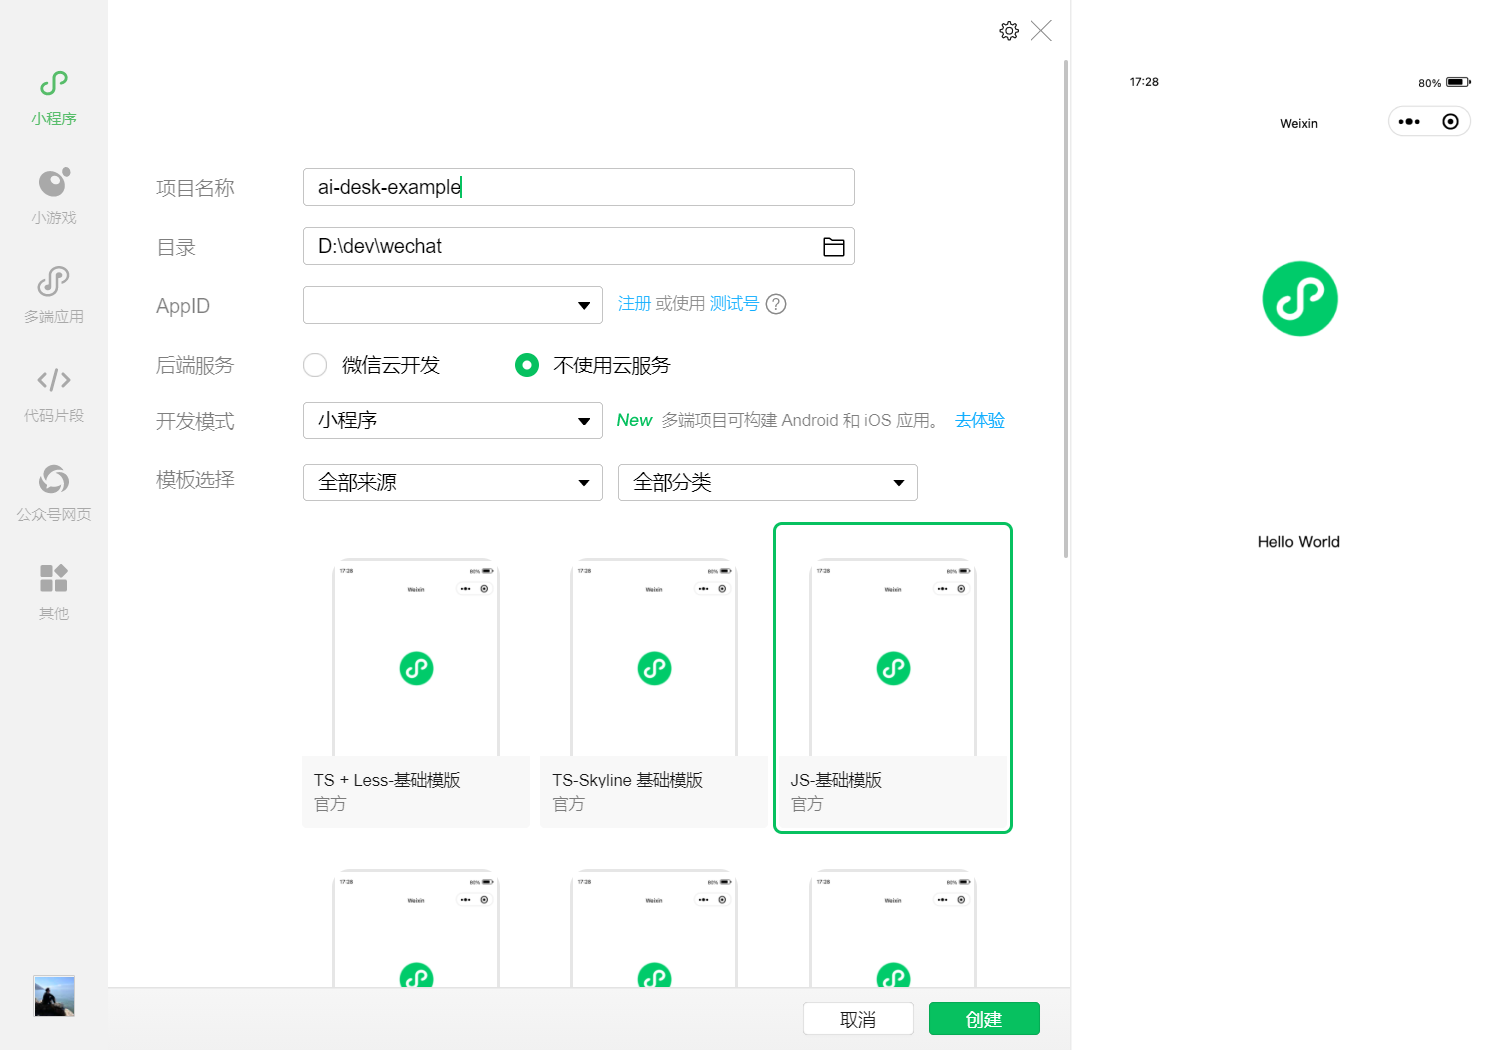
步骤1:创建项目
在微信开发者工具上创建一个使用 JS-基础模板的小程序项目(是否使用模板,是否使用 TS 均可),如图所示:
步骤2:下载 UIKit
微信开发者工具创建的小程序项目默认没有 package.json,因此您需要先创建 package.json 文件。
npm init -y通过 NPM 方式下载 UIKit。
npm i @tencentcloud/ai-desk-customer-wechat@latest为了方便您对 UI 进行扩展,请在项目的根目录下执行以下命令,将 UIKit 源码复制到项目中。
【macOS 端】
mkdir -p ./ai-desk-customer-wechat &&
rsync -av --exclude={'node_modules','package.json','excluded-list.txt','script'} ./node_modules/@tencentcloud/ai-desk-customer-wechat/ ai-desk-customer-wechat/
【Windows 端】
xcopy .\node_modules\@tencentcloud\ai-desk-customer-wechat .\ai-desk-customer-wechat /i /e步骤3:分包引入 UIKit
为了规避小程序主包体积超限问题,我们建议您将客服 UIKit 放入分包。
1. 工程配置
【app.js】
说明:
以下代码使用了分包异步化的技术方案。
"use strict";
Object.defineProperty(exports, Symbol.toStringTag, { value: "Module" });
let common_vendor;
require.async('./ai-desk-customer-wechat/common/vendor').then((res) => {
    common_vendor = res;
    const _sfc_main = {
        onLaunch: function() {
          console.log("App Launch");
        },
        onShow: function() {
          console.log("App Show");
        },
        onHide: function() {
          console.log("App Hide");
        }
      };
      function createApp() {
        const app = common_vendor.createSSRApp(_sfc_main);
        return {
          app
        };
      }
      createApp().app.mount("#app");
      exports.createApp = createApp;
}).catch(({ errMsg, mod }) => {
    console.error(`path: ${mod}, ${errMsg}`)
});
【app.json】
说明:
请务必配置 subPackages和 preloadRule。
{
  "pages": [
    "pages/index/index"
  ],
  "subPackages": [
    {
      "root": "ai-desk-customer-wechat",
      "pages": [
        "pages/index/index"
      ],
      "entry": "index.js"
    }
  ],
  "preloadRule": {
    "ai-desk-customer-wechat/pages/index/index": {
      "network": "all",
      "packages": [
        "ai-desk-customer-wechat"
      ]
    }
  },
  "window": {
    "navigationBarTextStyle": "black",
    "navigationBarTitleText": "Weixin",
    "navigationBarBackgroundColor": "#ffffff"
  },
  "style": "v2",
  "componentFramework": "glass-easel",
  "sitemapLocation": "sitemap.json"
}
2. 在项目主包页面中配置智能客服的入口
【主包 pages/index/index.js】
Page({
  data: {
  },
  getSupport() {
    // SDKAppID/userID/userSig 的获取请参考步骤4
    const SDKAppID = 0;
    const userID = '';
    const userSig = '';
    wx.navigateTo({
      url: `/ai-desk-customer-wechat/pages/index/index?SDKAppID=${SDKAppID}&userID=${userID}&userSig=${userSig}`
    })
  },
})
【主包 pages/index/index.wxml】
<button class="get-support" bind:tap="getSupport">咨询客服</button>【主包 pages/index/index.wxss】
page {
  height: 100vh;
  display: flex;
  flex-direction: column;
}

.get-support {
    background-color: #0052d9;
    color: #ffffff;
    margin: auto;
}
步骤4:获取 SDKAppID 、userID 、 userSig
获取 SDKAppID、userID、userSig 信息后填写到 pages/index/index.js 中对应的字段上。
const SDKAppID = 0;// Your SDKAppID
const userID = '';// Your userID
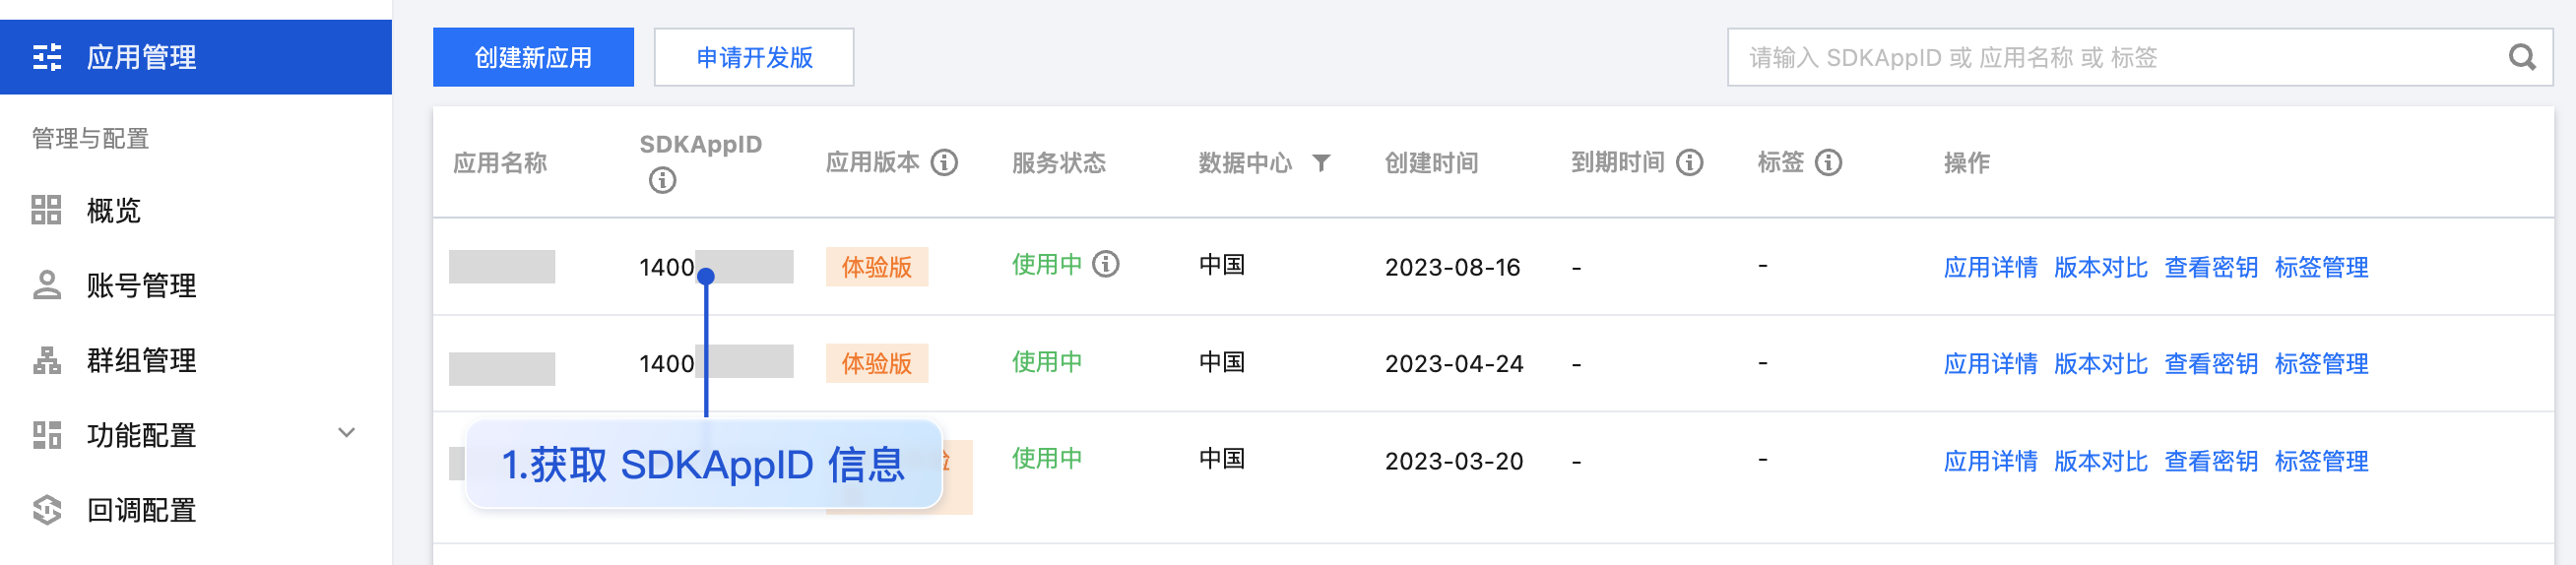
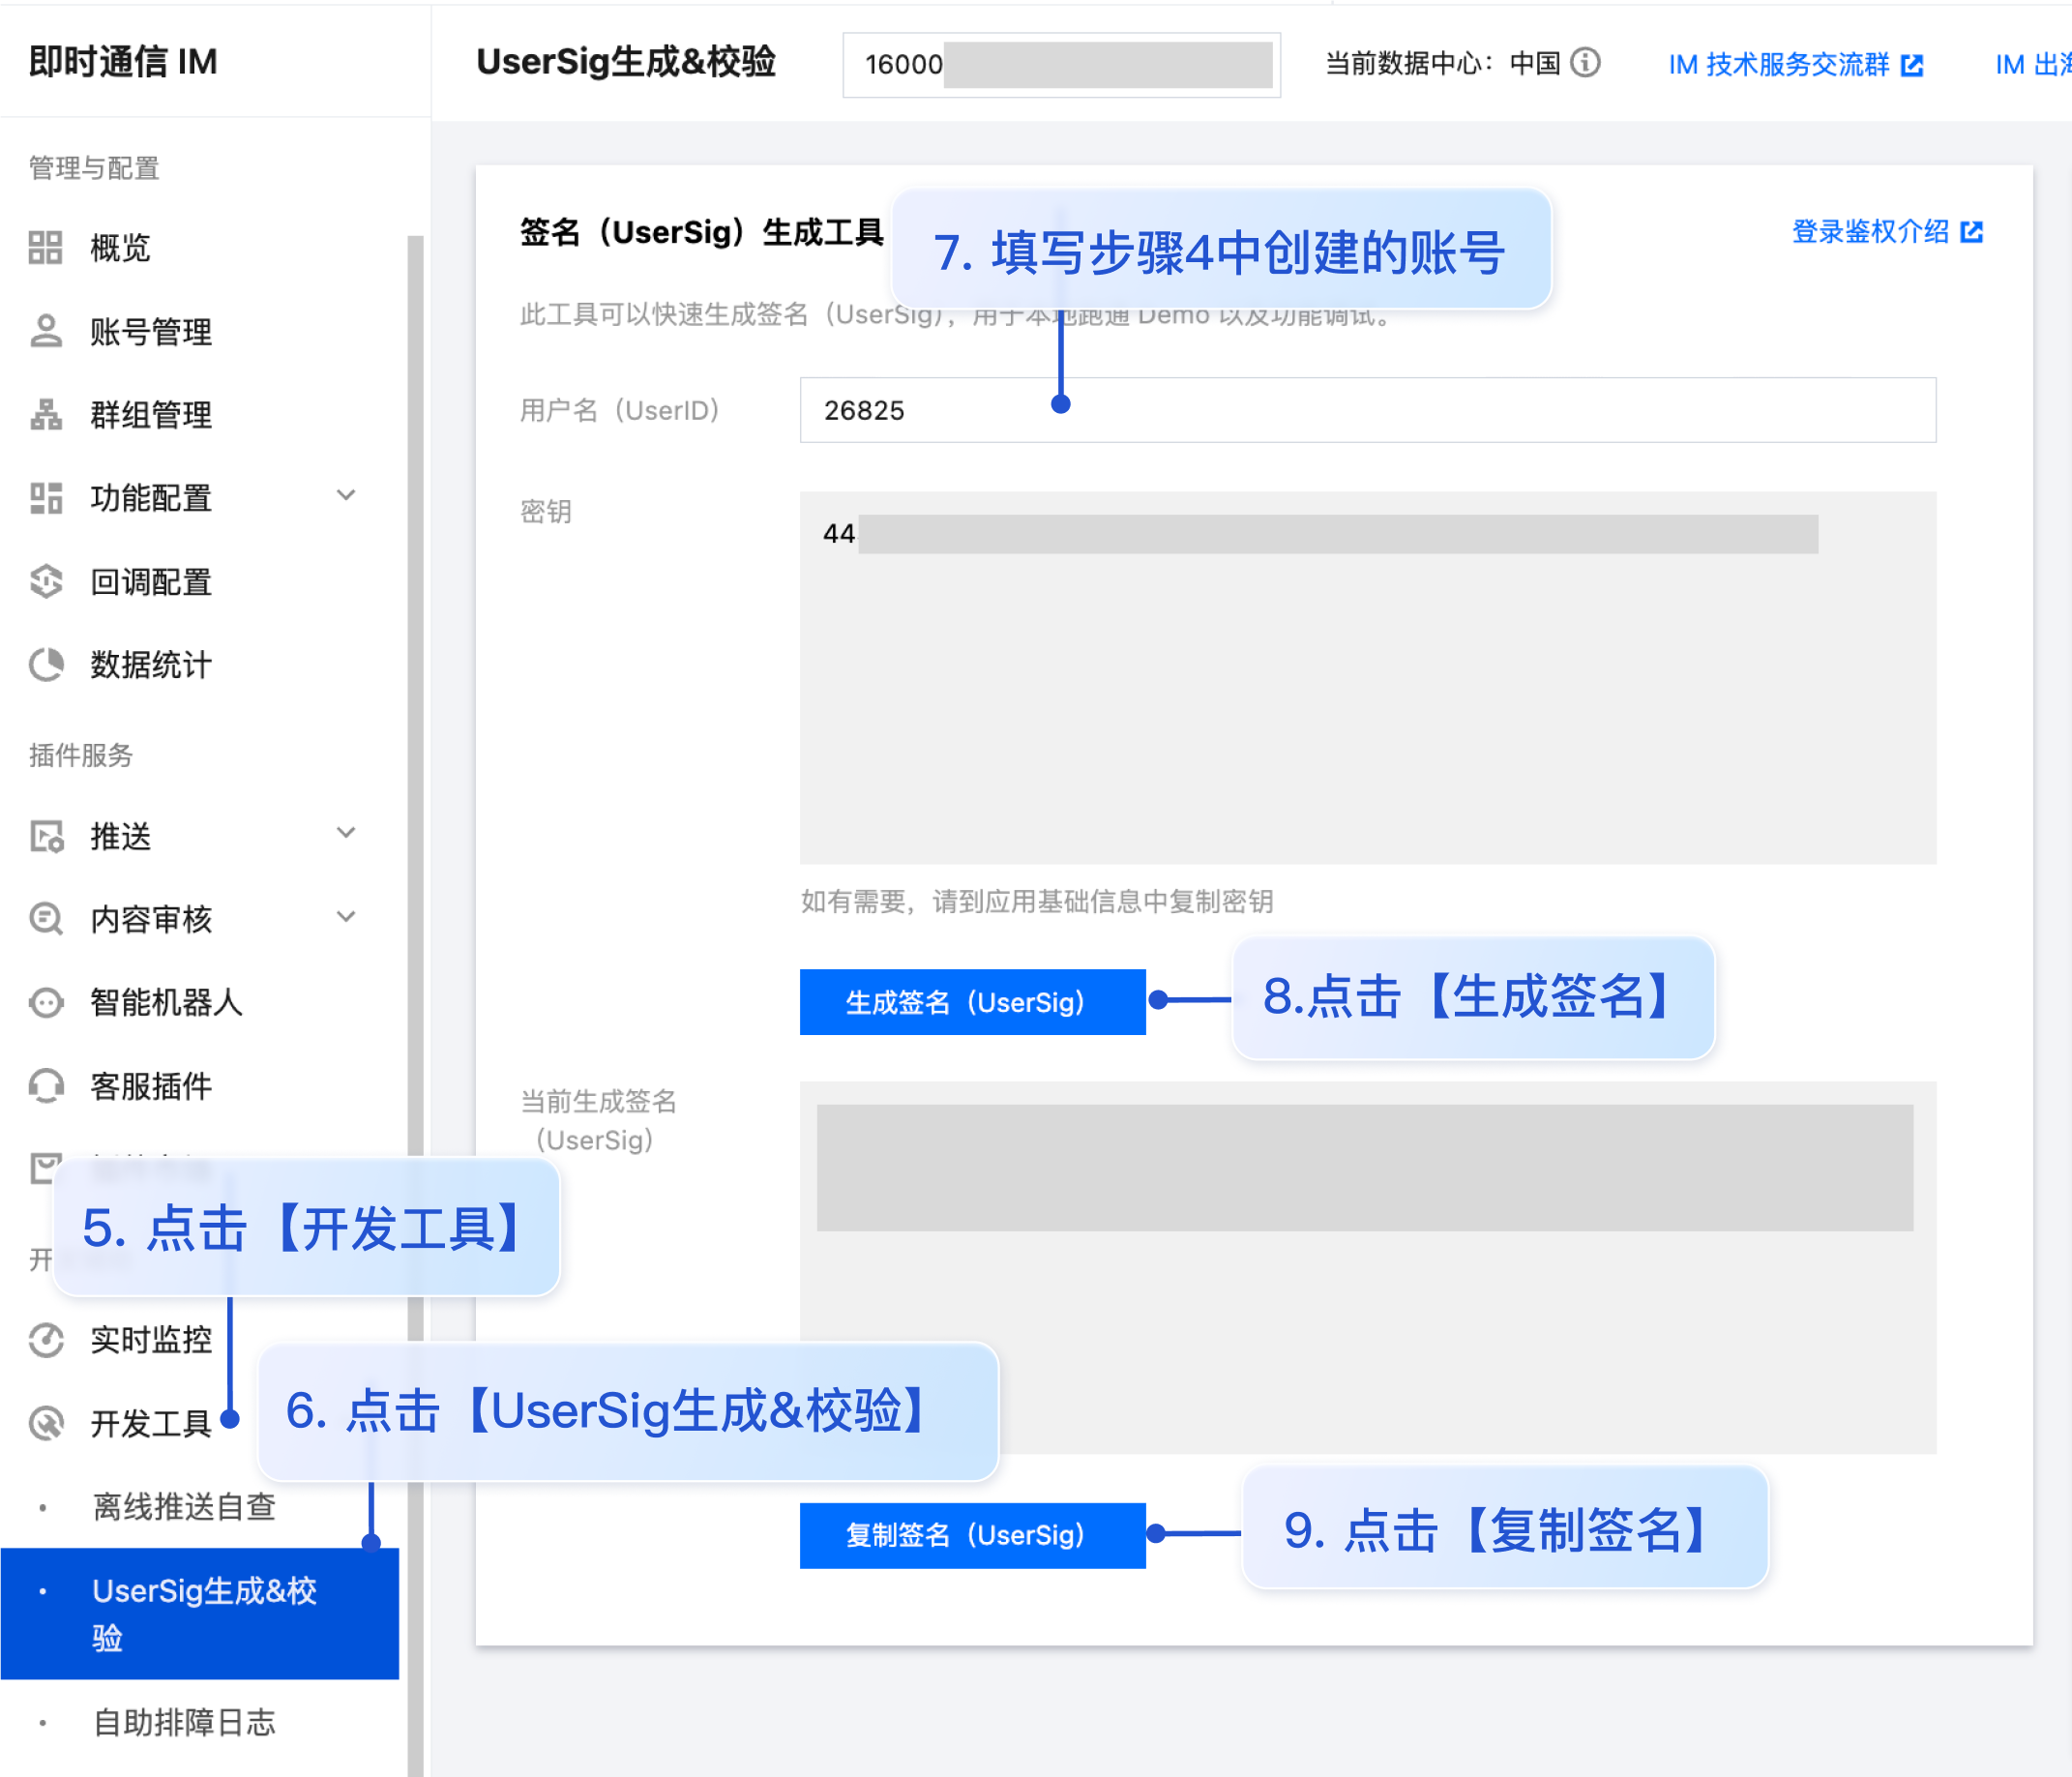
const userSig = '';// Your userSigSDKAppID 信息,可通过 即时通信 IM 控制台 获取:
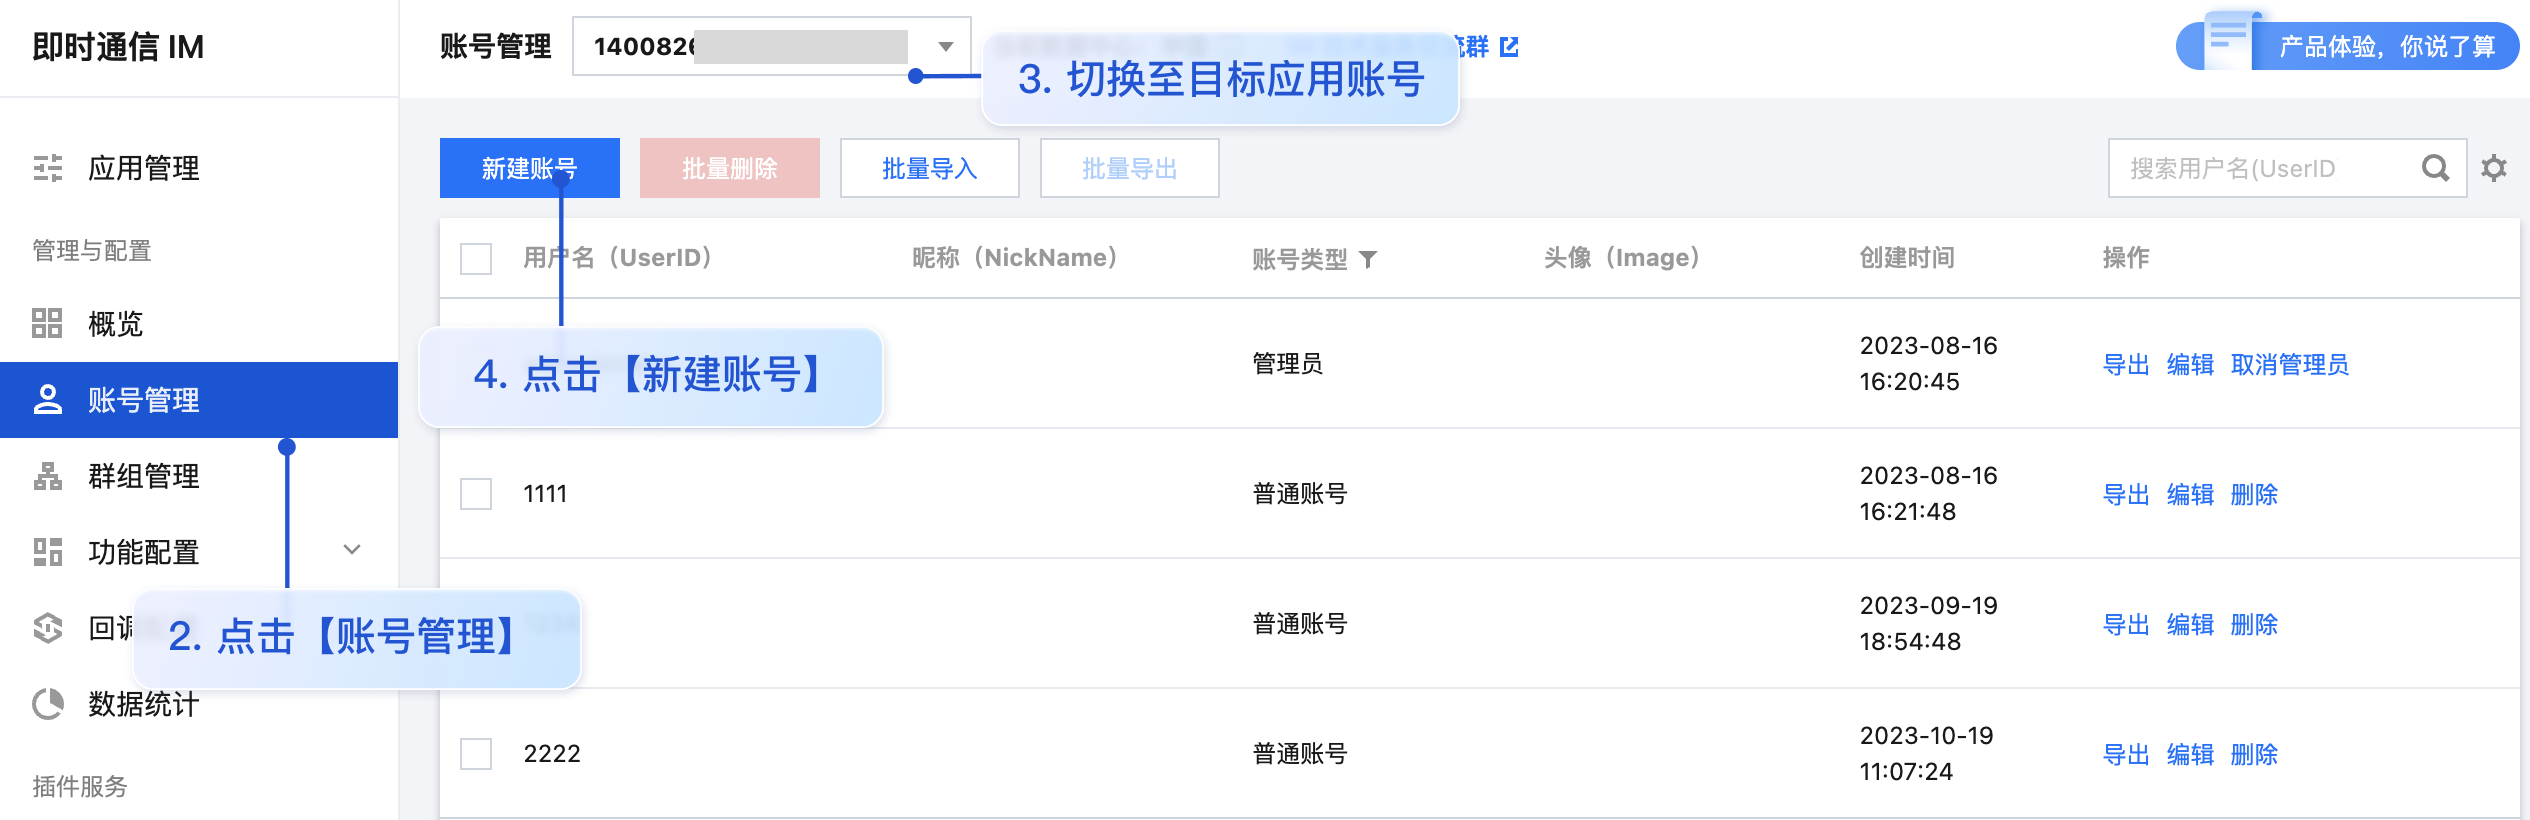
userID 信息,可单击 即时通信 IM 控制台 > 账号管理,切换至目标应用所在账号,创建 2 个 userID 方便后续体验聊天功能。
userSig 信息,可单击 即时通信 IM 控制台 > 开发工具 > UserSig生成&校验,填写创建的 userID,即可生成 userSig。
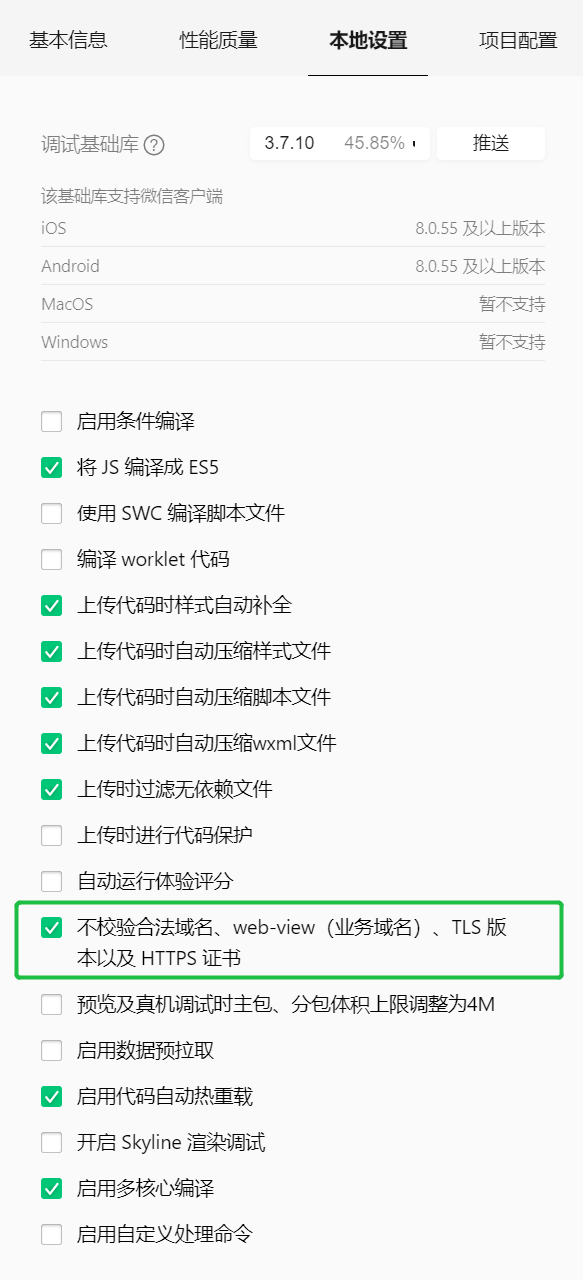
步骤5:启动项目,并发起您的第一条客服咨询
测试前,请先清理微信开发者工具的缓存,并勾选本地设置 > 不校验合法域名。
常见问题
什么是 UserSig?如何生成 UserSig?
UserSig 是用户登录即时通信 IM 的密码,其本质是对 UserID 等信息加密后得到的密文。
UserSig 签发方式是将 UserSig 的计算代码集成到您的服务端,并提供面向项目的接口,在需要 UserSig 时由您的项目向业务服务器发起请求获取动态 UserSig。更多详情请参见 服务端生成 UserSig。
小程序如果需要上线或者部署正式环境怎么办?
请在 微信公众平台 > 开发 > 开发管理 > 开发设置 > 服务器域名中进行域名配置。域名配置详细参见:小程序合法域名。
交流与反馈
点此进入 IM 社群,享有专业工程师的支持,解决您的难题。