
Package Exports
- authing-js-sdk
This package does not declare an exports field, so the exports above have been automatically detected and optimized by JSPM instead. If any package subpath is missing, it is recommended to post an issue to the original package (authing-js-sdk) to support the "exports" field. If that is not possible, create a JSPM override to customize the exports field for this package.
Readme
authing-js-sdk
JavaScript SDK 支持 Angular.js, React.js, Vue.js 以及 Node.js.我们提供了完全一致的接口.
安装
NPM
当构建大规模应用时,我们推荐使用npm进行安装, 它可以与一些模块打包工具很好地配合使用,如 Webpack, Browserify。
# latest stable
$ npm install authing-js-sdk --save
开始使用
使用方法
ES5
在ES5中我们使用 Promise 处理异步编程。
var Authing = require('authing-js-sdk');

// 对Client ID和Client Secret进行验证,获取Access Token
var auth = new Authing({
    clientId: 'your_client_id',
    secret: 'your_app_secret'
});

auth.then(function(validAuth) {

    //验证成功后返回新的authing-js-sdk实例(validAuth),可以将此实例挂在全局

    validAuth.login({
        email: 'test@testmail.com',
        password: 'testpassword'
    }).then(function(user) {
        console.log(user);
    }).catch(function(error) {
        console.log(error);
    });

}).catch(function(error) {
    //验证失败
    console.log(error);
});
ES6+
在ES6+中,我们使用 async 函数 和 await 关键字 处理异步编程。
import Authing from 'authing-js-sdk';

const main = async () => {

    //使用async时需要使用try...catch...捕捉错误

    let auth;

    try{
        auth = await new Authing({
            clientId: 'your_client_id',
            secret: 'your_app_secret'
        });
    }catch(error) {
        console.log('Authing验证失败:', error);
    }

    if(auth) {

        let user;

        try {
            user = await auth.login({
                email: 'test@testmail.com',
                password: 'testpassword'
            });
        }catch(error) {
            console.log('登录失败:', error);
        }

        if(user) {
            console.log('login success');
        }else {
            console.log('login failed');
        }

    }

}

main();
小程序扫码登录
小程序扫码登录指使用Authing小程序身份管家执行微信登录。
示例:小程序扫码登录
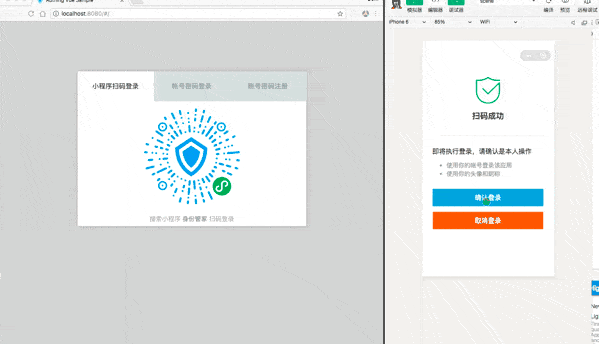
基础用法
使用startWXAppScaning方法:
var Authing = require('authing-js-sdk');

// 对Client ID和Client Secret进行验证,获取Access Token
var auth = new Authing({
    clientId: 'your_client_id',
    secret: 'your_app_secret'
});

auth.then(function(validAuth) {

    validAuth.startWXAppScaning({
        mount: 'qrcode-node', //二维码挂载点的HTML元素ID,如不写则默认漂浮在文档中间
    });

})
扫码完成后会自动跳到用户配置的URL上。
参数说明
validAuth.startWXAppScaning({
      mount: 'qrcode-node', // 二维码挂载点,如不写则默认漂浮在文档中间
      redirect: true, // 是否执行跳转(在用户后台配置的URL),默认为true,相关用户信息回传至url上
      onSuccess: function(res) {}, // 登录成功后回调函数,redirect为true时不回调此函数
      onError: function(error) {}, // 登录失败后回调函数,一般为网络问题
      interval: 1500, // 每隔多少秒检查一次,默认1500
      tips: '搜索小程序 <strong>身份管家</strong> 扫码登录', // 提示信息,可写HTML
});
了解更多,请查看:使用小程序扫码登录
Node.js其他生态中间件
当在浏览器使用时,我们会将用户token以'_authing_token'字段存在localStorage中,后面都会从localStorage中读取并进行验证。
了解更多报错的详情,请查看错误代码。
获取Client ID和Client Secret,请点击这里。