
Package Exports
- syntax-cli
- syntax-cli/dist/special-symbols.js
This package does not declare an exports field, so the exports above have been automatically detected and optimized by JSPM instead. If any package subpath is missing, it is recommended to post an issue to the original package (syntax-cli) to support the "exports" field. If that is not possible, create a JSPM override to customize the exports field for this package.
Readme
syntax 
Syntactic analysis toolkit, language agnostic parsers generator.
Implements LR and LL parsing algorithms.
You can get an introductory overview of the tool in this article.
Table of Contents
- Installation
- Developement
- CLI usage example
- Parser generation
- Language agnostic parser generator
- Lexical grammar and tokenizer
- Parsing modes
- Module include, and parser events
Installation
The tool can be installed as an NPM module (notice, it's called syntax-cli there):
npm install -g syntax-cli

syntax-cli --help
Developement
- Fork the https://github.com/DmitrySoshnikov/syntax repo
- Make your changes
- Make sure
npm testpasses (add new tests if needed) - Submit a PR
NOTE: If you need to implement a Syntax plugin for a new target programming language, address this instruction.
For development from the github repository, run build command to transpile ES6 code:
git clone https://github.com/<your-github-account>/syntax.git
cd syntax
npm install
npm run build

./bin/syntax --help
Or for faster development cycle, one can also use watch command (notice though, it doesn't copy template files, but only transpiles ES6 code; for templates copying you have to use build command):
npm run watchCLI usage example
./bin/syntax --grammar examples/grammar.lr0 --parse "aabb" --mode lr0 --table --collectionParser generation
To generate a parser module, specify the --output option, which is a path to the output parser file. Once generated, the module can normally be required, and used for parsing strings based on a given grammar.
Example for the JSON grammar:
./bin/syntax --grammar examples/json.ast.js --mode SLR1 --output json-parser.js

✓ Successfully generated: json-parser.js
Loading as a JS module:
const JSONParser = require('./json-parser');

let value = JSONParser.parse('{"x": 10, "y": [1, 2]}');

console.log(value); // JS object: {x: 10, y: [1, 2]}
Language agnostic parser generator
See this instruction how to implement a new plugin.
JavaScript default
Syntax is language agnostic when it comes to parser generation. The same grammar can be used for parser generation in different languages. Currently Syntax supports JavaScript, Python, PHP, Ruby, and C#. The target language is determined by the output file extension.
Python plugin
For example, this is how to use the same calculator grammar example to generate parser module in Python:
./bin/syntax -g examples/calc.py.g -m lalr1 -o calcparser.pyThe calcparser module then can be required normally in Python for parsing:
>>> import calcparser
>>> calcparser.parse('2 + 2 * 2')
>>> 6
Another example shows how to use parser hooks (such as on_parse_begin, on_parse_end, and other) in Python. They are discussed below in the module include section.
PHP plugin
For PHP the procedure is pretty much the same, take a look at the similar example:
./bin/syntax -g examples/calc.php.g -m lalr1 -o CalcParser.phpThe output file contains the class name corresponding to the file name:
<?php

require('CalcParser.php');

var_dump(CalcParser::parse('2 + 2 * 2')); // int(6)
The parser hooks for PHP can be found in this example.
Ruby plugin
Ruby is another target language supported by Syntax. Its calculator example is very similar:
./bin/syntax -g examples/calc.rb.g -m lalr1 -o CalcParser.rbAnd also the output file contains the class name corresponding to the file name:
require 'CalcParser.php'

puts CalcParser.parse('2 + 2 * 2') // 6
Ruby's parsing hooks can be found in the following example.
C# plugin
Syntax supports as well C# as a target language. See its calculator example:
./bin/syntax -g examples/calc.cs.g -m lalr1 -o CalcParser.csThen callers can use the module as:
using SyntaxParser;

...

var parser = new CalcParser();
Console.WriteLine(parser.parse("2 + 2 * 2")); // 6
Parsing hooks example in C# format can be found in this example.
Lexical grammar and tokenizer
Tokenizers use formalism of regular grammars in order to split a string to a list of tokens. One of the convenient implementations of the regular grammars is regular expressions.
A basic format of a lexical grammar should provide at least rules section:
{
  rules: [
    [`\\d+`,    `return 'NUMBER'`],
    [`"[^"]*"`, `yytext = yytext.slice(1, -1); return 'STRING';`],
    ...
  ],
}
The first element of a lexical rule is the regexp pattern to match, and the second element is the corresponding token handler, which should return type of the matched token.
Handlers may access the matched text as yytext variable, which is also can be mutated -- in the example above for the STRING token we modify matched text to be the quoted value, stripping the quotes themselves.
A handler can be arbitrary complex function, and in addition may return multiple tokens, using an array (see also this example):
// Return 3 tokens for one matched value.
return ['DEDENT', 'DEDENT', 'NL'];
Lexical grammar may also define macros field -- variables which can be used later in rules, and also start conditions for tokenizer states, which are discussed below.
{
  macros: {
    id: `[a-zA-Z0-9_]`,
  },

  rules: [
    [`{id}+`,    `return 'IDENTIFIER'`],
    ...
  ],
}
Getting list of tokens
It is possible to analyze just a list of tokens either from the lex part of the --grammar, or from a standalone --lex file.
Example:
// ~/lang.lex

{
  rules: [
    [`\\s+`,       `/* skip whitespace */`],
    [`\\d+`,       `return 'NUMBER'`],
    [`(\\+|\\-)`,  `return 'ADDITIVE_OPERATOR'`],
  ],
}
Extract the tokens:
./bin/syntax --lex ~/lang.lex --tokenize -p '2 + 5'The result:
[
  {
    "type": "NUMBER",
    "value": "2",
    "startOffset": 0,
    "endOffset": 1,
    "startLine": 1,
    "endLine": 1,
    "startColumn": 0,
    "endColumn": 1
  },
  {
    "type": "ADDITIVE_OPERATOR",
    "value": "+",
    "startOffset": 2,
    "endOffset": 3,
    "startLine": 1,
    "endLine": 1,
    "startColumn": 2,
    "endColumn": 3
  },
  {
    "type": "NUMBER",
    "value": "5",
    "startOffset": 4,
    "endOffset": 5,
    "startLine": 1,
    "endLine": 1,
    "startColumn": 4,
    "endColumn": 5
  }
]
As you can see, along with the type, and the value, a tokenizer also captures token locations: absolute offsets, line, and column numbers.
Using custom tokenizer
NOTE: built-in tokenizer uses underlying regexp implementation to extract stream of tokens.
It is possible to provide a custom tokenizer if a built-in isn't sufficient. For this pass the --custom-tokenizer option, which is a path to a file that implements a tokenizer. In this case the built-in tokenizer code won't be generated.
./bin/syntax --grammar examples/json.ast.js --mode SLR1 --output json-parser.js --custom-tokenizer './my-tokenizer.js'

✓ Successfully generated: json-parser.js
In the generated code, the custom tokenizer is just required as a module: require('./my-tokenizer.js').
The tokenizer should implement the following iterator-like interface:
initString: initializes a parsing string;hasMoreTokens: whether stream of tokens still has more tokens to consume;getNextToken: returns next token in the format{type, value};
For example:
// File: ./my-tokenizer.js

const MyTokenizer = {

  initString(string) {
    this._string = string;
    this._cursor = 0;
  },

  hasMoreTokens() {
    return this._cursor < this._string.length;
  },

  getNextToken() {
    // Implement logic here.

    return {
      // Basic data.
      type: <<TOKEN_TYPE>>,
      value: <<TOKEN_VALUE>>,

      // Location data.
      startOffset: <<START_OFFSET>>,
      endOffset: <<END_OFFSET>>,
      startLine: <<START_LINE>>,
      endLine: <<END_LINE>>,
      startColumn: <<START_COLUMN>>,
      endColumn: <<END_COLUMN>>,
    }
  },
};

module.exports = MyTokenizer;
Start conditions of lex rules, and tokenizer states
Built-in tokenizer supports stateful tokenization. This means the same lex rule can applied in different states, and result to a different token. For lex rules it's known as start conditions.
Rules with explicit start conditions are executed only when lexer enters the state corresponding to their names. Start conditions can be inclusive (%s, 0), and exclusive (%x, 1). Inclusive conditions also include rules without any start conditions, and exclusive conditions do not include other rules when the parser enter their state. The rules with * start condition are always included.
"lex": {
  "startConditions": {
    "comment": 1, // exclusive
    "string": 1   // exclusive
  },

  "rules": [
    ...

    // On `/*` enter `comment` state:
    ["\\/\\*", "this.pushState('comment');"],

    // The rule is executed only when tokenizers enters `comment`, or `string` state:
    [["comment", "string"], "\\n", "lines++; return 'NL';"],

    ...
  ],
}
More information on the topic can be found in this gist.
As an example take a look at this example grammar, which calculates line numbers in a source file, including line numbers in comments. The comments themselves are skipped during tokenization, however the new lines are handled within comments separately to count those line numbers as well.
Another example is the grammar for BNF itself, which we use to parse BNF grammars represented as strings, rather than in JSON format. There we have action start condition to correctly parse { and } of JS code, being inside an actual handler for a grammar rule, which is itself surrounded by { and } braces.
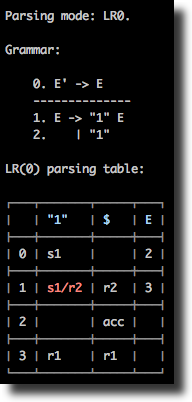
Parsing modes
Syntax supports several LR parsing modes: LR(0), SLR(1), LALR(1), CLR(1) as well LL(1) mode. The same grammar can be analyzed in different modes, from the CLI it's controlled via the --mode option, e.g. --mode slr1.
Note: de facto standard for automatically generated parsers is usually the LALR(1) parser. The CLR(1) parser, being the most powerful, and able to parse wider grammar sets, can have much more states than LALR(1), and usually is suitable for educational purposes. As well as its less powerful counterparts, LR(0) and SLR(1) which are less used on practice (although, some production-ready grammars can also normally be parsed by SLR(1), e.g. JSON grammar).
Some grammars can be handled by one mode, but not by another. In this case a conflict will be shown in the table.
LL parsing
Currently an LL(1) grammar is supposed to be already left-factored, and to be non-left-recursive. See section on LL conflicts for details.
Note: left-recursion elimination, and left-factoring process can be automated for most of the cases (excluding some edge cases, which should be done manually), and implement a transformation to a non-left-recursive grammar.
A typical LL parsing table is less, than a corresponding LR-table. However, LR grammars cover more languages than LL grammars. In addition, an LL(1) grammar usually might look less elegant, or even less readable, than an LR grammar. As an example, take a look at the calculator grammar in the non-left-recursive LL mode, left-recursive LR mode, and also left-recursive, and precedence-based LR-mode.
At the moment, LL parser only implements syntax validation, not providing semantic actions (e.g. to construct an AST). For the semantic handlers, and actual AST construction see LR parsing.
LR parsing
LR parsing, and its the most practical version, the LALR(1), is widely used in automatically generated parsers. LR grammars usually look more readable, than corresponding LL grammars, since in contrast with the later, LR parser generators by default allow left-recursion, and do automatic conflict resolutions. The precedence and assoc operators allow building more elegant grammars with smaller parsing tables.
Take a look at the example grammar with a typical syntax-directed translation (SDT), using semantic actions for AST construction, direct evaluation, and any other transformation.
LR conflicts
In LR parsing there are two main types of conflicts: "shift-reduce" (s/r) conflict, and "reduce-reduce" (r/r) conflict. Taking as an example grammar from examples/example1.slr1, we see that the parsing table is normally constructed for SLR(1) mode, but has a "shift-reduce" conflict if ran in the LR(0) mode:
./bin/syntax --grammar examples/example1.slr1 --table./bin/syntax --grammar examples/example1.slr1 --table --mode lr0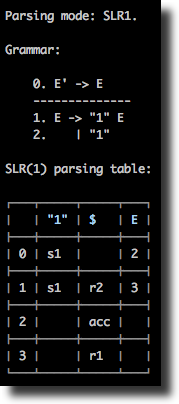
Conflicts resolution
Sometimes changing parsing mode is not enough for fixing conflicts: for some grammars conflicts may stay and in the LALR(1), and even the CLR(1) modes. LR conflicts can be resolved though automatically and semi-automatically by specifying precedence and associativity of operators.
For example, the following grammar has a shift-reduce conflict:
%token id

%%

E
  : E '+' E
  | E '*' E
  | id
  ;
Therefore, a parsing is not possible using this grammar:
./bin/syntax -g examples/calculator-assoc-conflict.g -m lalr1 -w -p 'id * id + id'

Parsing mode: LALR(1).

Parsing: id * id + id

Rejected: Parse error: Found "shift-reduce" conflict at state 6, terminal '+'.
This can be fixed though using operators associativity and precedence:
%token id

%left '+'
%left '*'

%%

E
  : E '+' E
  | E '*' E
  | id
  ;
See detailed description of the conflicts resolution algorithm in this example grammar, which is can be parsed normally:
./bin/syntax -g examples/calculator-assoc.g -m lalr1 -w -p 'id * id + id'

Parsing mode: LALR(1).

Parsing: id * id + id

✓ Accepted
Module include, and parser events
The moduleInclude directive allows injecting an arbitrary code to the generated parser file. This is usually code to require needed dependencies, or to define them inline. As an example, see the corresponding example grammar, which defines all classes for AST nodes inline, and then uses them in the rule handlers.
The code can also define handlers for some parse events (attaching them to yyparse object), in particular for onParseBegin and onParseEnd. This allow injecting a code which is executed when the parsing process starts, and ends accordingly.
"moduleInclude": `
  class Node {
    constructor(type) {
      this.type = type;
    }
  }

  class BinaryExpression extends Node {
    ...
  }

  // Event handlers.

  yyparse.onParseBegin = (string) => {
    console.log('Parsing code:', string);
  };

  yyparse.onParseEnd = (value) => {
    console.log('Parsed value:', value);
  };
`,

...

["E + E",  "$$ = new BinaryExpression($1, $3, $2)"],