Package Exports
- hollowdb
Readme
![]()

![]()
![]()
HollowDB
HollowDB is a decentralized privacy-preserving key-value database on Arweave network, powered by Warp Contracts.
HollowDB has two modus operandi: proofs and whitelisting. Both can be enabled together, or separately.
When using proofs:
- Anyone can read and put.
- To update or remove a value at some key, user must provide a proof of preimage knowledge of that key.
When using whitelisting:
- Anyone can read.
- To put, the user must have been whitelisted by the contract owner to do PUT operations.
- To update or remove, the user must have been whitelisted by the contract owner to do UPDATE operations.
The table below summarizes the requirements to make a transaction on HollowDB:
| Requirements | Put | Update | Remove | Read |
|---|---|---|---|---|
| with Proofs | - | Zero-Knowledge Proof | Zero-Knowledge Proof | - |
| with Whitelisting | PUT whitelist | UPDATE whitelist | UPDATE whitelist | - |
Installation
To install HollowDB:
# yarn
yarn add hollowdb
# npm
npm install hollowdb
Usage
HollowDB exposes the following:
- an
SDKclass that exposes basic operations, such as CRUD. - an
Adminclass that additionally exposes higher authorized operations, such as state updates and ownership changes.
import {SDK, Admin} from 'hollowdb';
import type {HollowDbSdkArgs} from 'hollowdb';
import {WarpFactory} from 'warp-contracts';

const warp = WarpFactory.forMainnet();
const sdk = new SDK(signer, contractTxId, warp);
const admin = new Admin(signer, contractTxId, warp);
As shown in example, you must provide the 4 required arguments to Admin or SDK:
signer: your wallet, possibly read from disk in JSON format, or given in code. Make sure you.gitignoreyour wallet files! You can also provide a CustomSignature here, such as your EVM wallet.contractTxId: the transaction id of the contract. You can connect to an existing contract, or deploy one of your own and provide it's id here.warp: the Warp instance to be used, could be for mainnet, testnet or local.
SDK Operations
SDK provides the basic CRUD functionality.
// the key is Poseidon hash of your secret
import {poseidon1} from 'poseidon-lite';
const key = poseidon1([yourSecret]);

// GET is open to everyone
await sdk.get(key);

// PUT does not require a proof
await sdk.put(key, value);

// UPDATE with a proof
let {proof} = await prover.generateProof(keyPreimage, curValue, newValue);
await sdk.update(key, newValue, updateProof);

// UPDATE without a proof
await sdk.update(key, newValue);

// REMOVE with a proof
let {proof} = await prover.generateProof(keyPreimage, curValue, null);
await sdk.remove(key, proof);

// REMOVE without a proof
await sdk.remove(key);

// read state variables
const {cachedValue} = await sdk.readState();
For more detailed explanation on the prover, see the related section below.
Admin Operations
The admin can change the contract state, but it does not have SDK functions in it as we don't expect the Admin to be used in such a way; Admin should only be instantiated when a major change such as changing the owner or the verification key is required.
// verification key is an object obtained from Circom & SnarkJS
await admin.setVerificationKey(verificationKey);

// newOwner is a JWK wallet object, to ensure that you have access to the new owner
await admin.setOwner(newOwner);

// proofs checking
await admin.setProofRequirement(false); // e.g. disables proof checking

// whitelisting
await admin.setWhitelistRequirement({
  put: true, // e.g. check for whitelist on PUT operations
  update: false, // but don't care for UPDATE & REMOVE operations
});

// add some user addresses to the PUT whitelist
await admin.addUsersToWhitelist([aliceAddr, bobAddr], 'put');

// remove someone from the whitelist
await admin.removeUsersFromWhitelist([bobAddr], 'put');
Contract Operations
We do not immediately provide contract operations from the package; however, if you are to clone the repository you will find the following utility scripts:
yarn contract:buildwill build the contract from source. The contract is written in TypeScript, but to deploy using Warp you require the JS implementation, for which we use ESBuild. This will generate the built contract underbuild/hollowDB/contract.js. Node version ">=18" is needed.yarn contract:deploy <wallet-name>will deploy your contract, where it will look for an Arweave wallet at./config/wallet/wallet-name.json. If no wallet name is provided,wallet-mainis used by default.yarn contract:evolve <wallet-name> <contract-tx-id>will evolve your contract, it takes a wallet name and the contract txId of the old contract.
Values larger than 2KB
Currently Warp Contracts only support transactions that are below 2KB in size. Since 2KB may not be sufficient for all use cases, we suggest using bundlr to upload your data to Arweave network, and only store the transaction ID within the contract.
In other words, you will store key, valueTxId instead of key, value! This will enable you to store arbitary amounts of data, and retrieve them with respect to their transaction ids, also while reducing the overall size of the contract.
We use such an approach in our HollowDB gRPC server, for more details please refer to this document.
Caching Options
Warp allows additional cache types, such as useStateCache and useContractCache; as well as overriding the underlying key-value storage. For all of these, you can pass in LMDB or Redis caches made for Warp.
You can do this as shown below, and you just have to pass in the resulting warp instance to HollowDB.
import {defaultCacheOptions} from 'warp-contracts';
import {LmdbCache} from 'warp-contracts-lmdb';
import {RedisCache} from 'warp-contracts-redis';

// using LMDB
warp
  .useStateCache(
    new LmdbCache(
      {
        ...defaultCacheOptions,
        dbLocation: './cache/warp/state',
      },
      LIMIT_OPTS
    )
  )
  .useContractCache(
    new LmdbCache({
      ...defaultCacheOptions,
      dbLocation: './cache/warp/contract',
    }),
    new LmdbCache({
      ...defaultCacheOptions,
      dbLocation: './cache/warp/src',
    })
  )
  .useKVStorageFactory(
    (contractTxId: string) =>
      new LmdbCache({
        ...defaultCacheOptions,
        dbLocation: `./cache/warp/kv/lmdb_2/${contractTxId}`,
      })
  );

// or using Redis
warp
  .useStateCache(
    new RedisCache({
      client: redisClient,
      prefix: `${hollowDBTxId}.state`,
      allowAtomics: false,
      ...LIMIT_OPTS,
    })
  )
  .useContractCache(
    new RedisCache({
      client: redisClient,
      prefix: `${hollowDBTxId}.contract`,
      allowAtomics: false,
      ...LIMIT_OPTS,
    }),
    new RedisCache({
      client: redisClient,
      prefix: `${hollowDBTxId}.src`,
      allowAtomics: false,
      ...LIMIT_OPTS,
    })
  )
  .useKVStorageFactory(
    (contractTxId: string) =>
      new RedisCache({
        client: redisClient,
        prefix: `${hollowDBTxId}.${contractTxId}`,
        allowAtomics: false,
      })
  );
Zero-Knowledge Proofs
HollowDB is a key-value database where each key in the database is the Poseidon hash of some preimage. The client provides a "preimage knowledge proof" to update or remove a value at that key. Additional constraints on the current value and next value to be written are also given to the proof as a preventive measure against replay attacks and middle-man attacks.
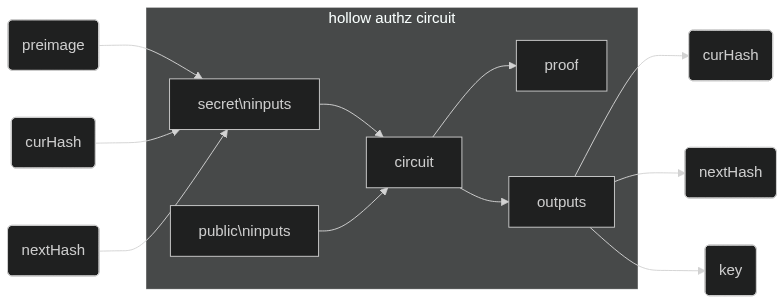
As shown above, all inputs are secret for HollowDB prover, although curHash and nextHash are immediately provided as an output.
Generating Proofs
To generate proofs, you need a WASM circuit file and a prover key. To verify them, you need the verification key. All of these can be found under the circuits folder, for both Groth16 and PLONK proof systems! You can use the snippet below to create a prover class that can generate proofs for HollowDB:
import {ripemd160} from '@ethersproject/sha2';
const snarkjs = require('snarkjs');

export type ProofSystem = 'groth16' | 'plonk';

export class Prover {
  private readonly wasmPath: string;
  private readonly proverKey: string;
  public readonly proofSystem: ProofSystem;

  /**
   * Create a prover with the given WASM path and prover key path.
   * @param wasmPath path to the circuit's WASM file
   * @param proverKey path to the prover key
   */
  constructor(wasmPath: string, proverKey: string, proofSystem: ProofSystem) {
    this.wasmPath = wasmPath;
    this.proverKey = proverKey;
    this.proofSystem = proofSystem;
  }

  /**
   * Generate a proof for HollowDB.
   * If a value is given as null, it will be put as 0 in the proof.
   * @param preimage preimage of the key to be written at
   * @param curValue value currently stored
   * @param nextValue new value to be stored
   * @returns a fullProof object with the proof and public signals
   */
  async generateProof(
    preimage: bigint,
    curValue: unknown | null,
    nextValue: unknown | null
  ): Promise<{proof: object; publicSignals: [curValueHashOut: string, nextValueHashOut: string, key: string]}> {
    const fullProof = await snarkjs[this.proofSystem].fullProve(
      {
        preimage: preimage,
        curValueHash: curValue ? this.valueToBigInt(curValue) : 0n,
        nextValueHash: nextValue ? this.valueToBigInt(nextValue) : 0n,
      },
      this.wasmPath,
      this.proverKey
    );
    return fullProof;
  }

  /**
   * Convert a value into bigint using `ripemd160`.
   * - `ripemd160` outputs a hex string, which can be converted into a `bigint`.
   * - Since the result is 160 bits, it is for sure within the finite field of BN128.
   * @see https://docs.circom.io/background/background/#signals-of-a-circuit
   * @param value any kind of value
   */
  valueToBigInt = (value: unknown): bigint => {
    return BigInt(ripemd160(Buffer.from(JSON.stringify(value))));
  };
}
Proving in Browser
Since proof generation is using SnarkJS in the background, you might need to add some settings to your web app to run it. See the SnarkJS docs for this. For example, you could have an option like the following within your NextJS config file:
webpack: (config, { isServer }) => {
  if (!isServer) {
    config.resolve.alias = {
      ...config.resolve.alias,
      fs: false, // added for SnarkJS
      readline: false, // added for SnarkJS
    };
  }
  // added to run WASM for SnarkJS
  config.experiments = { asyncWebAssembly: true };
  return config;
},
Examples
There are various examples to demonstrate the basic operations of the HollowDB. A jwk must be provided inside the examples/config/wallet.js file to run.
Check out the example.js and exampleBundlr.js and configure the variables. To run:
# go to examples folder
cd examples
# install dependencies
yarn install
#
node example
Testing
There are Jest test suites for HollowDB operations that operate on a local Arweave instance using ArLocal. To run:
# run all tests
yarn test
# run a specific test
yarn test <path>
The test will run for both LMDB cache and Redis cache. For Redis tests to pass, you need to have a Redis server running, with the URL that you specify within the Jest config.
Styling
We are using the Google TypeScript Style Guide.
# formatting with prettier
yarn format
# linting with eslint
yarn lint